23.12 (December Release)
- Damith Samarakoon
We are delighted to announce our December-23 release.
The new release will start rolling out on the 5th of December.
Highlights
- New tools for creating data rich Dashboards
- Calculations based on Contract Information
- Set default values for user fields in a list
- Enhanced customisation options for designing forms
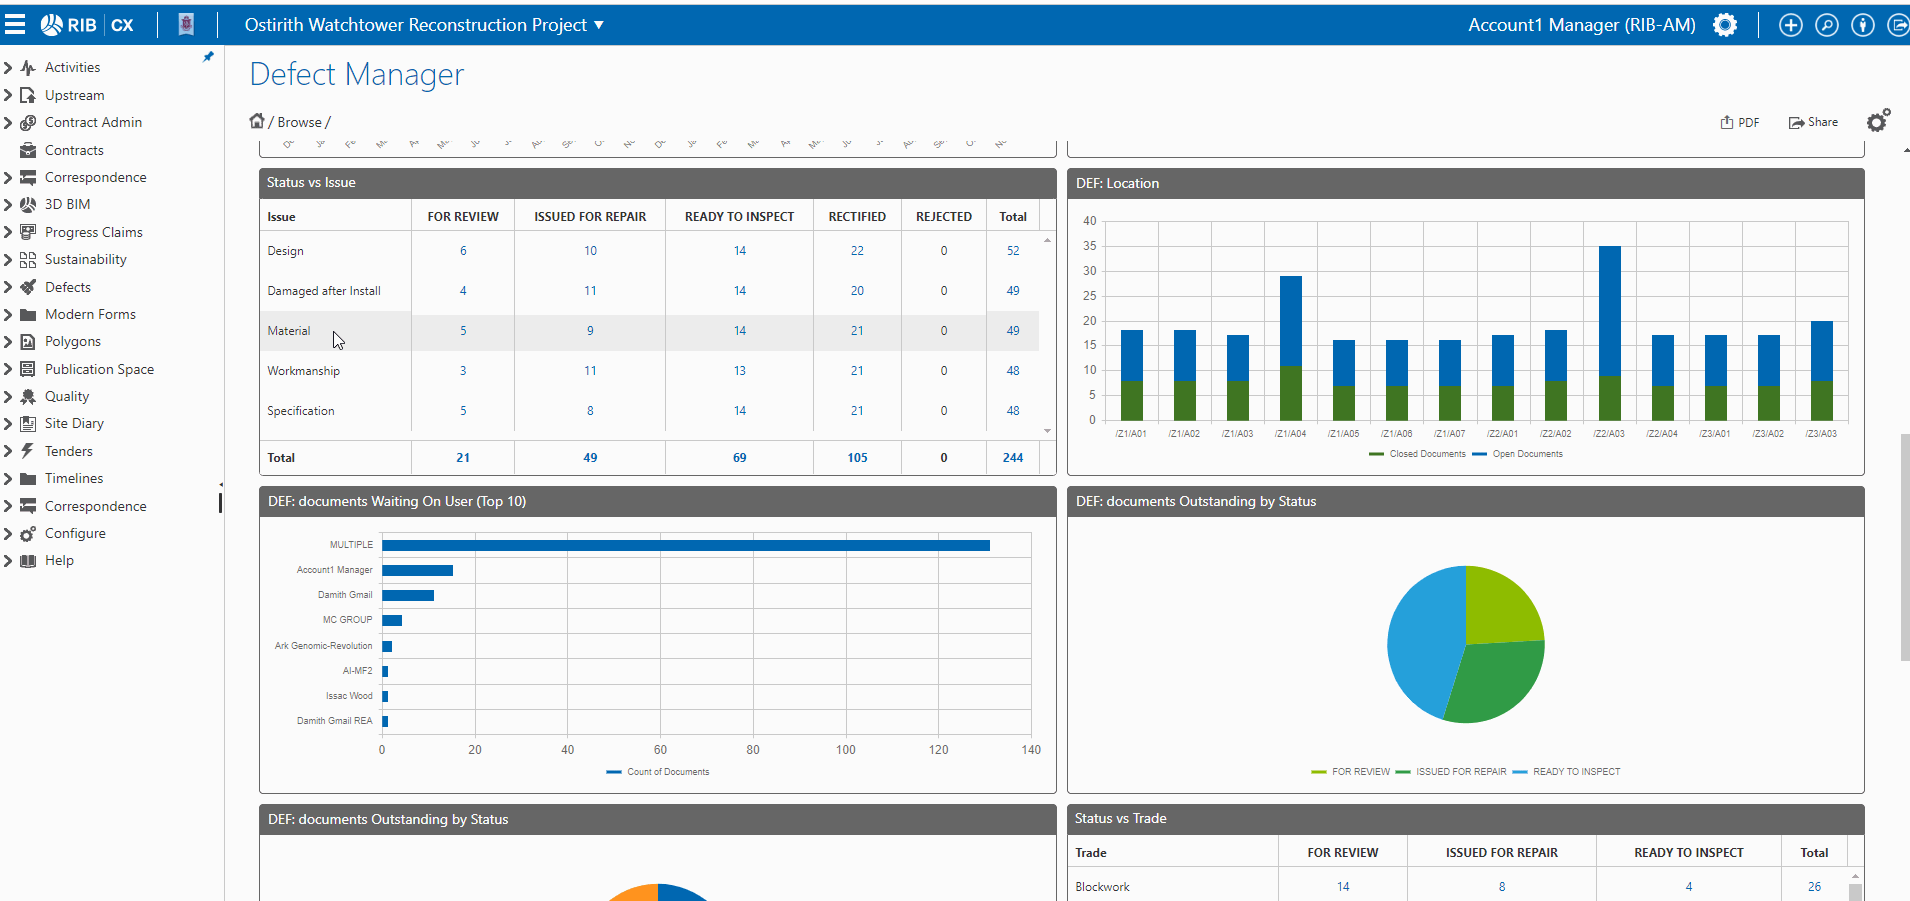
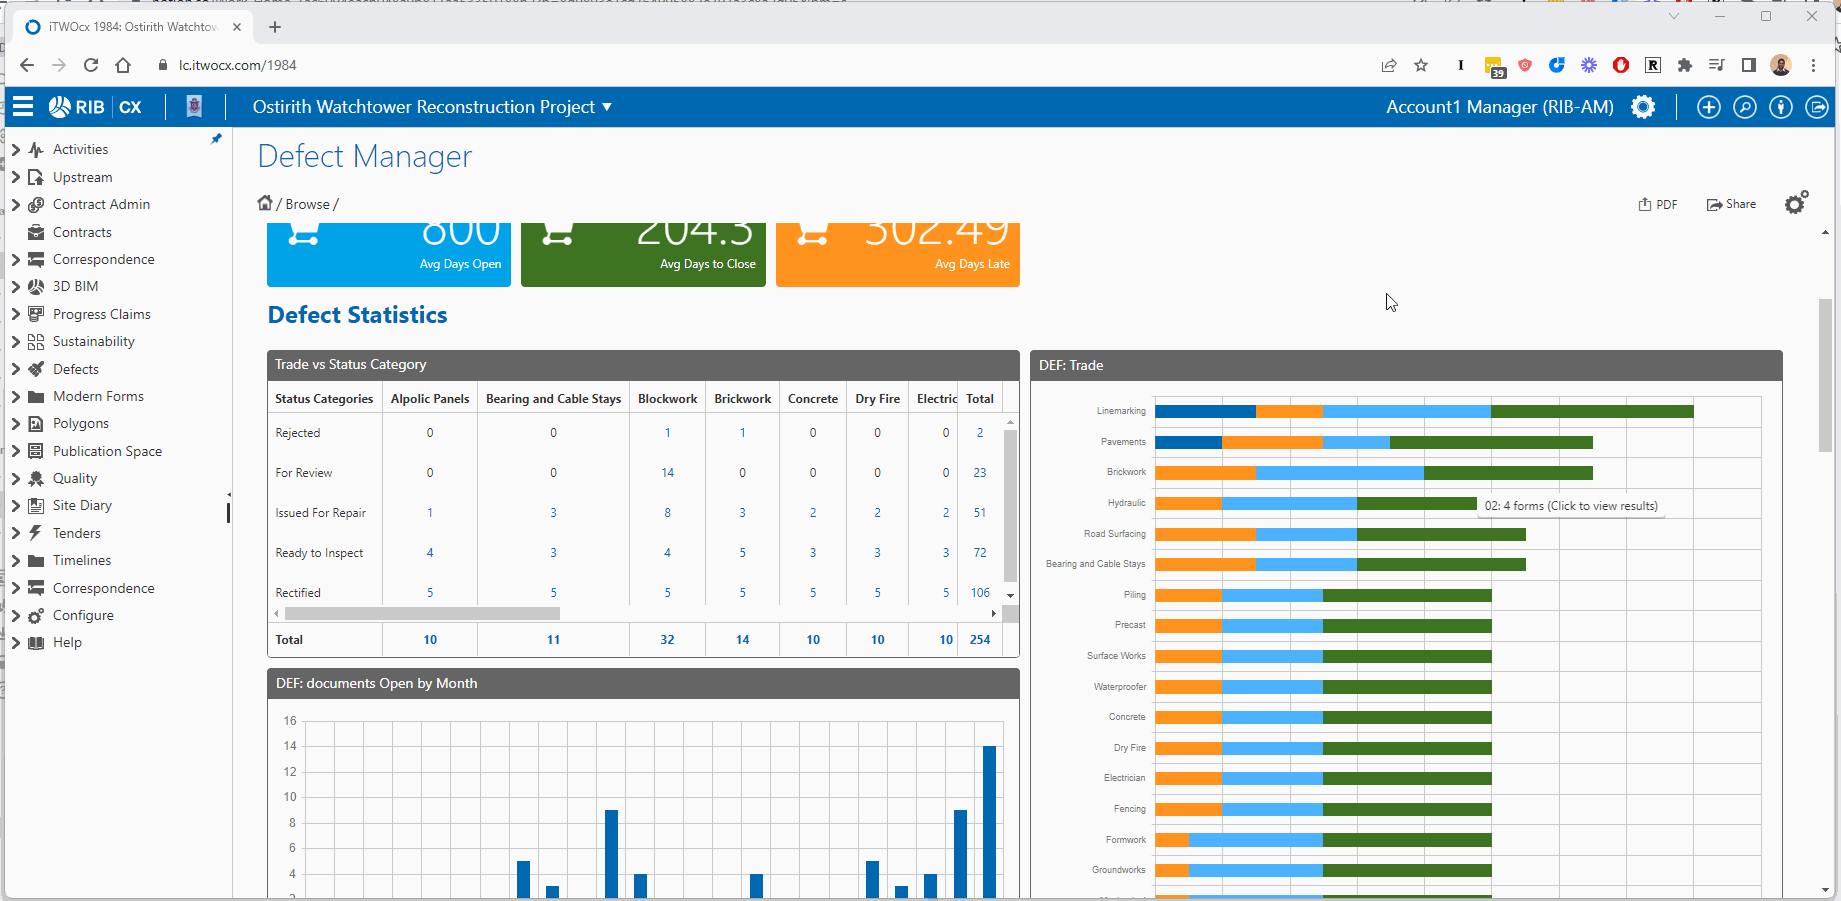
Dashboards
New Widgets
HIGHLIGHT
We have introduced a number of new widgets to help you report your processes and KPI's and provide better insights as to how your project is progressing.
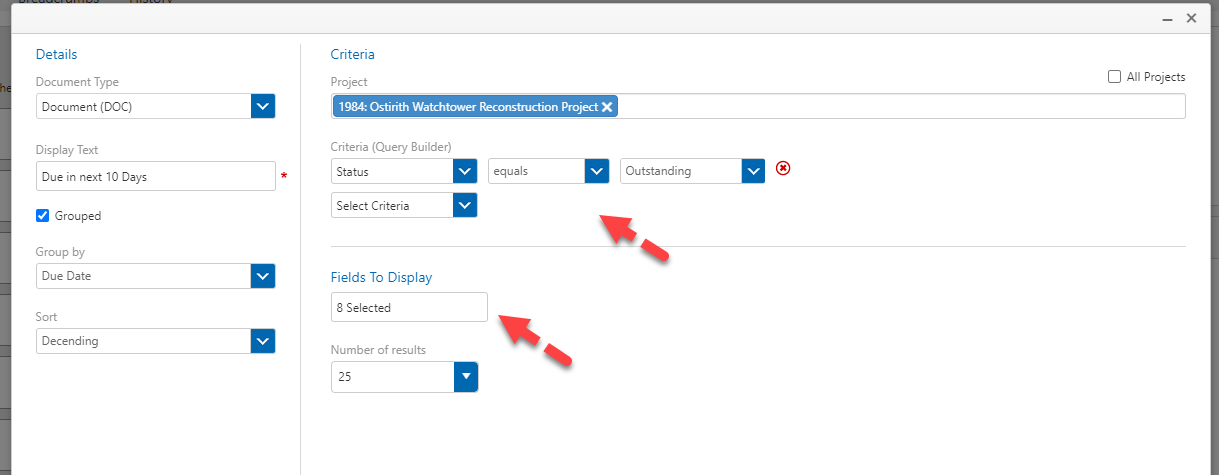
2-dimensional table
The 2-dimensional widget allows you to report on 2 aspects of your metadata in a tabular format. As an example below the widget is reporting on form status and Issue type.
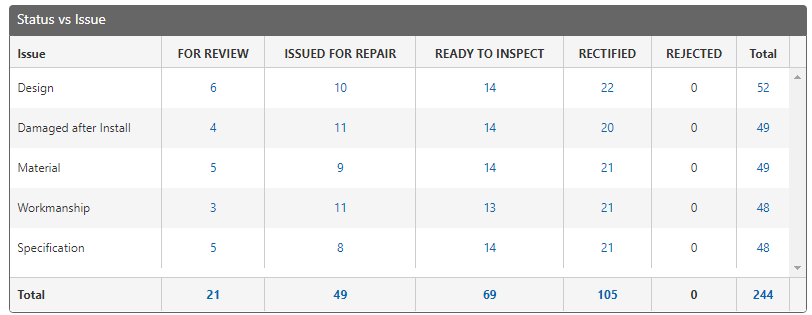
This is done by configuring the X and Y axis selections
This widget only supports a single form type at a time.
Supported standard fields
- Author
- Action user (where multiple users are in action, they will be shown in separate rows)
- Status
- Status Category
Available user fields
- Select
- Radio
- Checkbox
Cascading fields are not supported for this widget.
Sorting options available
- Total
- Column description
You can also configure how many results you wish to display. The results are the number of rows that will be shown in the table. The most you can show is 50 per page
Please note that the total columns at the bottom and on the right includes all the data not just the data shown within the table.
Drill into infomation
You can drill into the information in the table by clicking the counts within the table or the total columns or rows
This will automatically run a search to show you those results
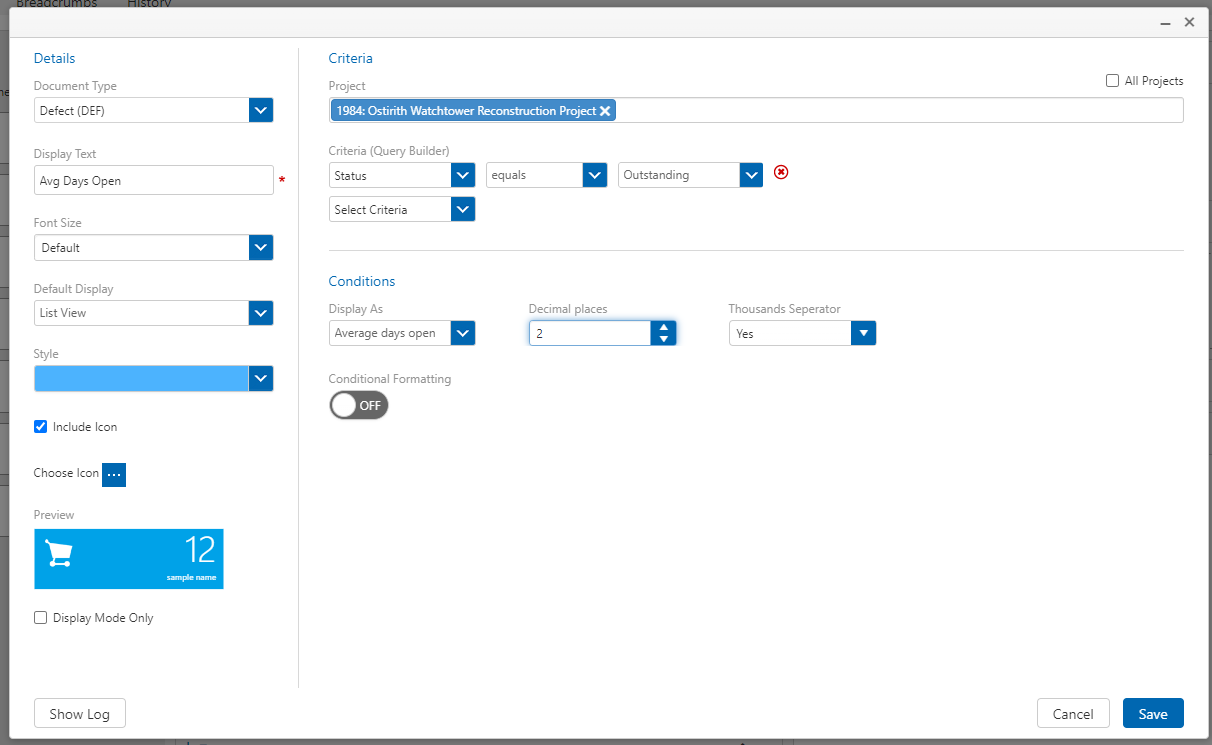
Average Days Open
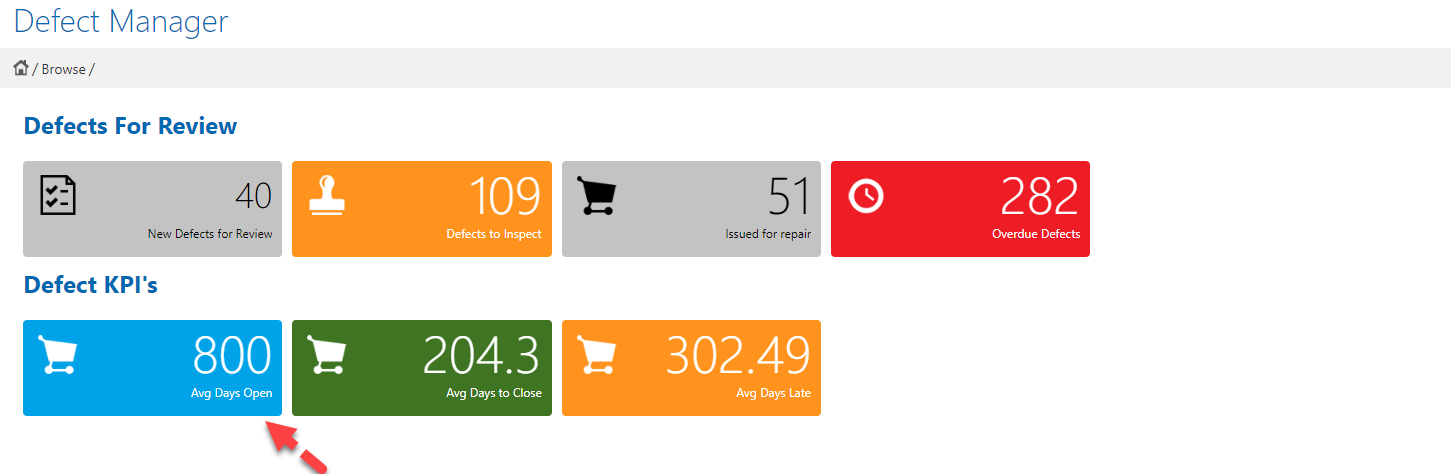
You can now report on the 3 date based KPI's for your forms, starting with the average days open.
Days open calculation = Current date - Issued date of the form
You can configure a count widget to display the average of this for a form type
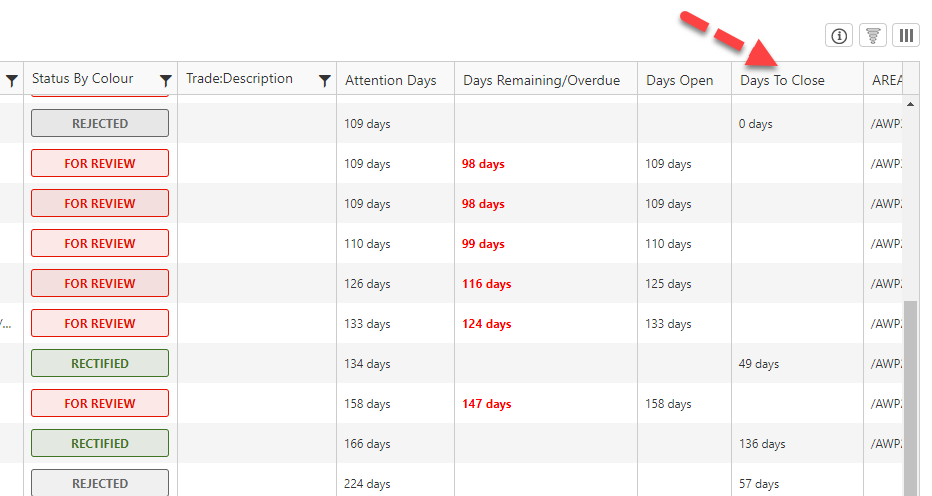
We've also added this as a new column that you can add to a form register or a saved search

Average Days To Closed
Similar to the average days open, you can also report on the average days to close via a count widget
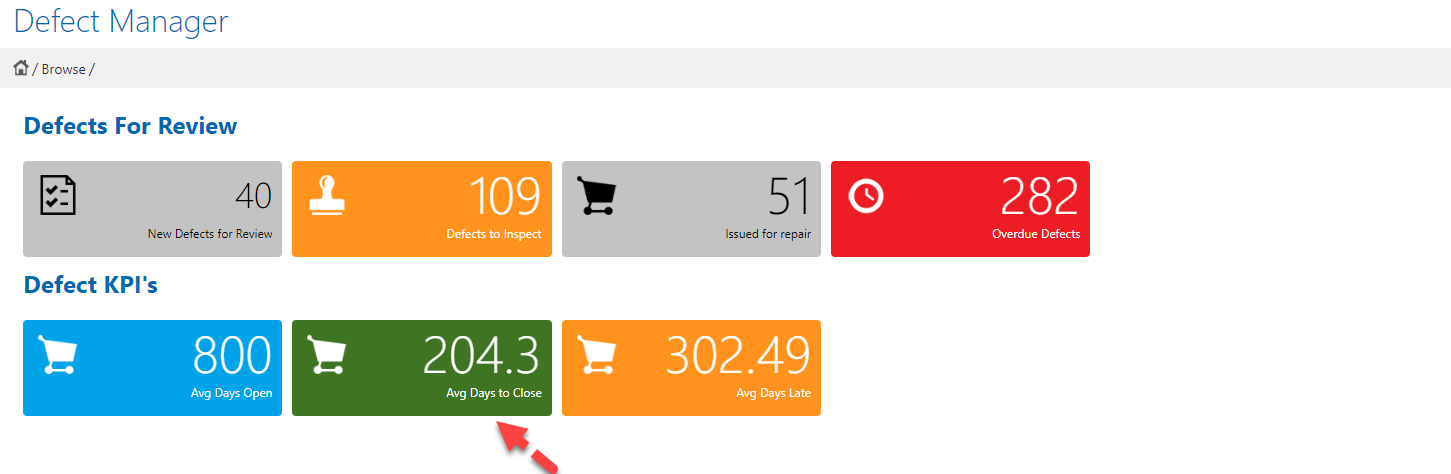
Days to close calculattion = last closed date - Issued date
The count widget will report on the average of this
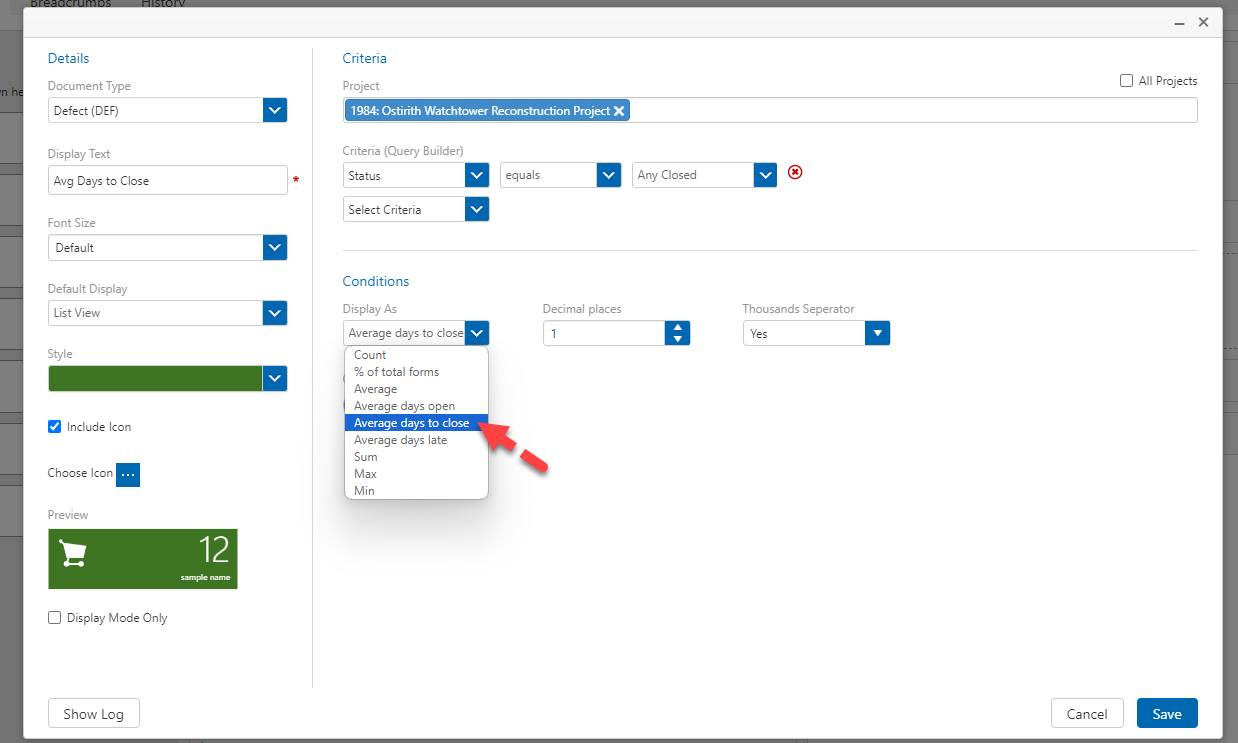
Days to close is also a column you can add to a register or a saved search
Average Days Late
Average days allows you to report on how many days a form has been overdue
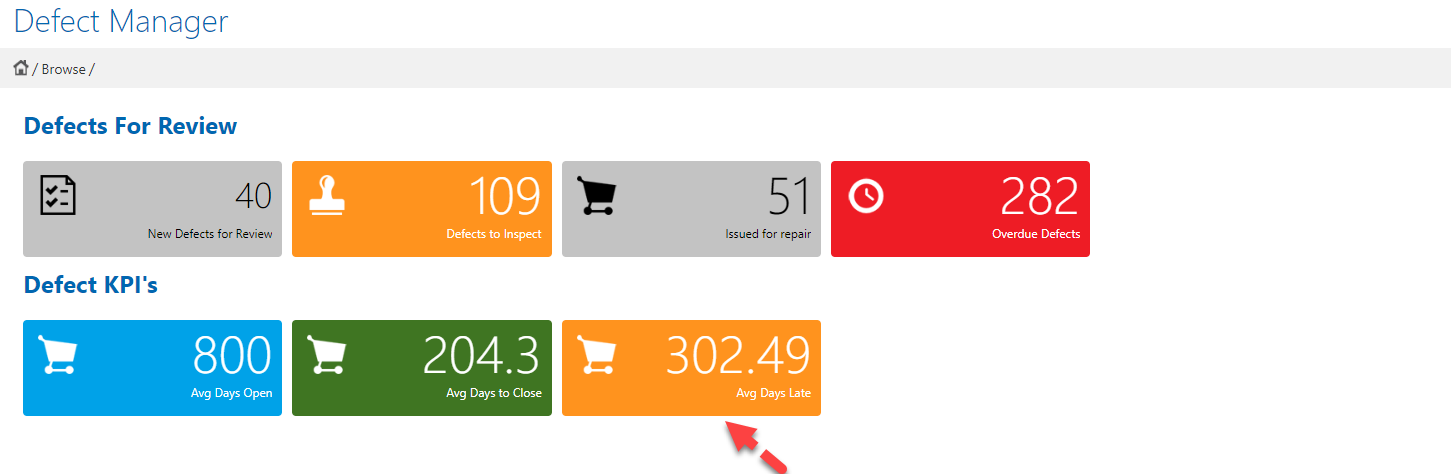
Days late = current date - due date
The count widget will allow you to calculate and display the average days late which is = total days late / number of non empty rows

List widget upgrade
The list widget has been upgraded to a register view. You will be able to configure criteria for which forms you wish to display along with columns you wish to display within the table.
Label
You can now add simple labels to customise and style your dashboards with ease.
Simply drag and drop and add the text for your label and click save and position it on the layout as needed

New Graphs Types
HIGHLIGHT
We've added additional graph types to enable you to have the flexibility to report on your data using the most apprpriate chart type. The new chart types are listed below
Horizontal Bar charts
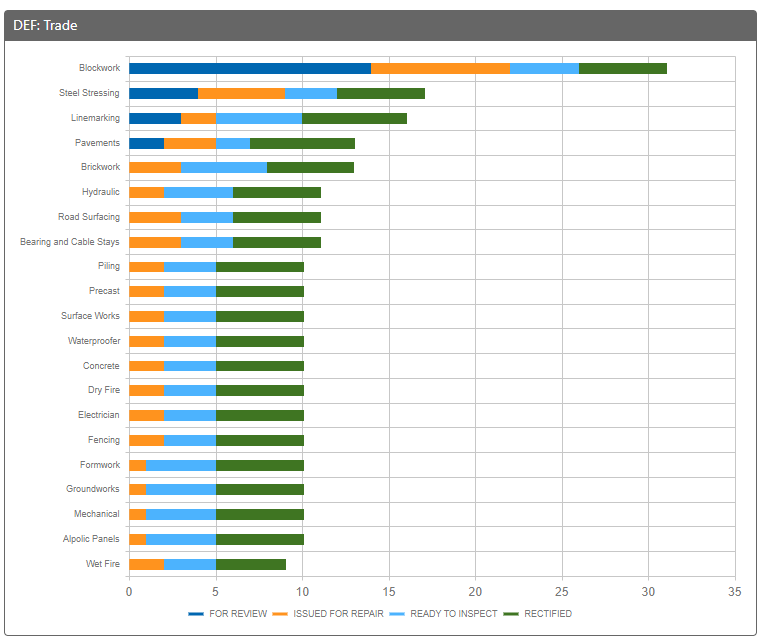
Donut Charts
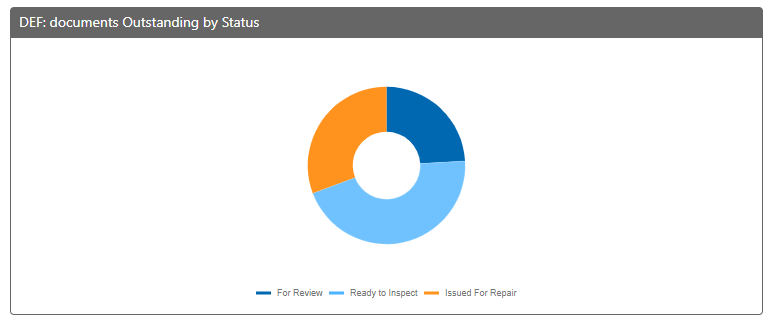
Pie Charts

Drill into information on charts
The charts are now dynamic, whereby you can click on the chart or a segment of a chart to automatically run a search to view those forms.
Clicking on charts that represent Cascading fields is not supported.
Calculations
HIGHLIGHT
Budget link user fields in calculations
You can now include a budget link user field when configuring a calculation user field. This now means you can configure, number, currency and budget link user fields as part of your calculations
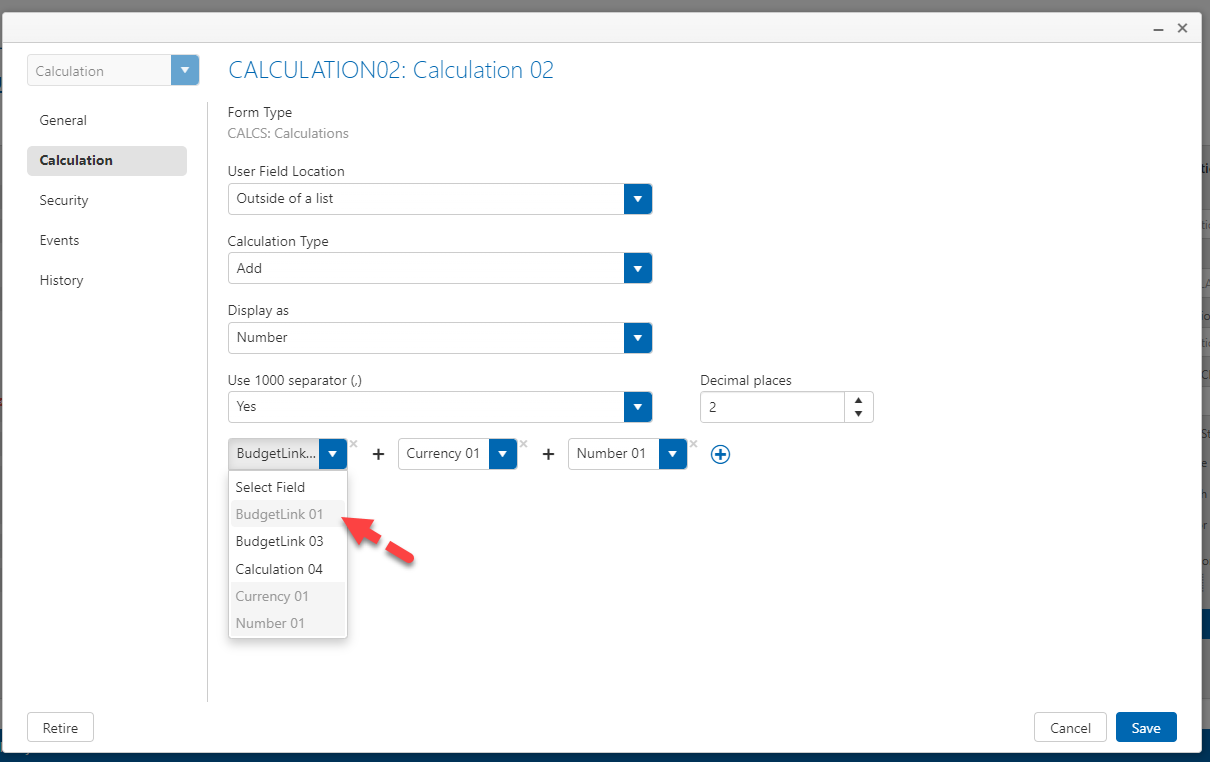
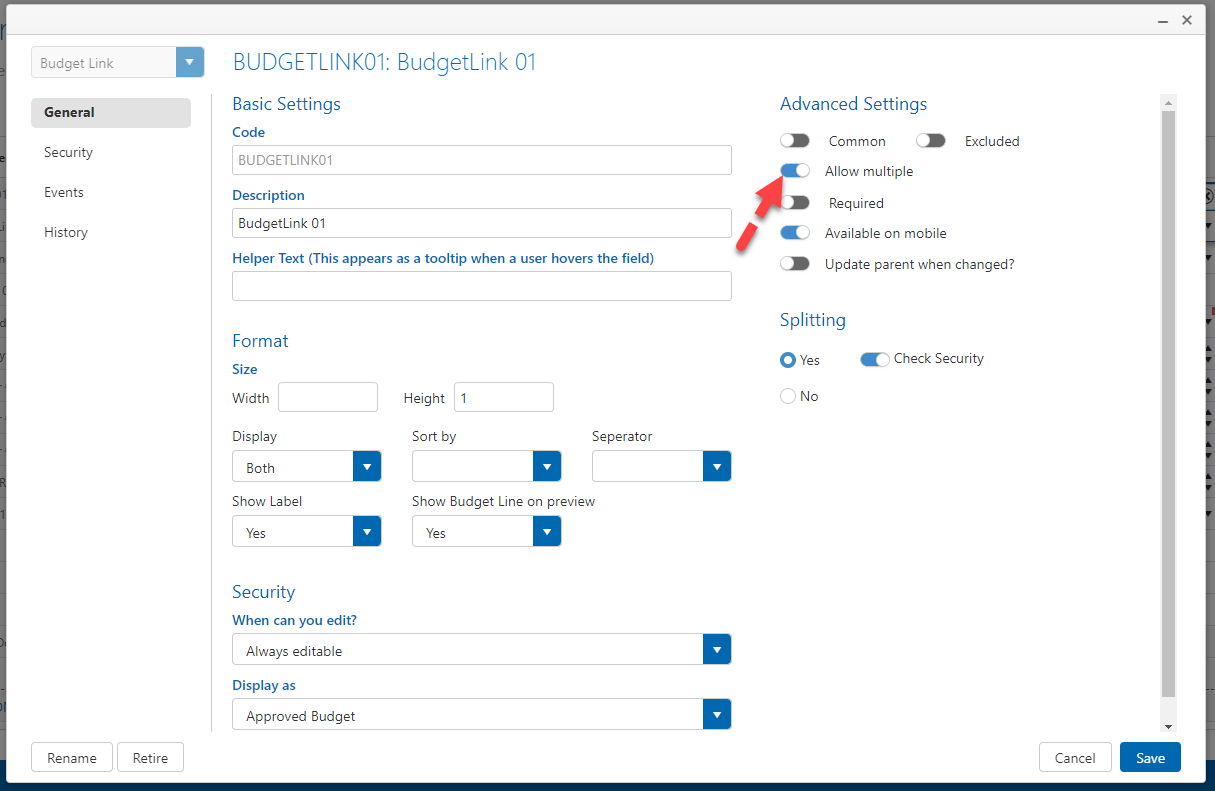
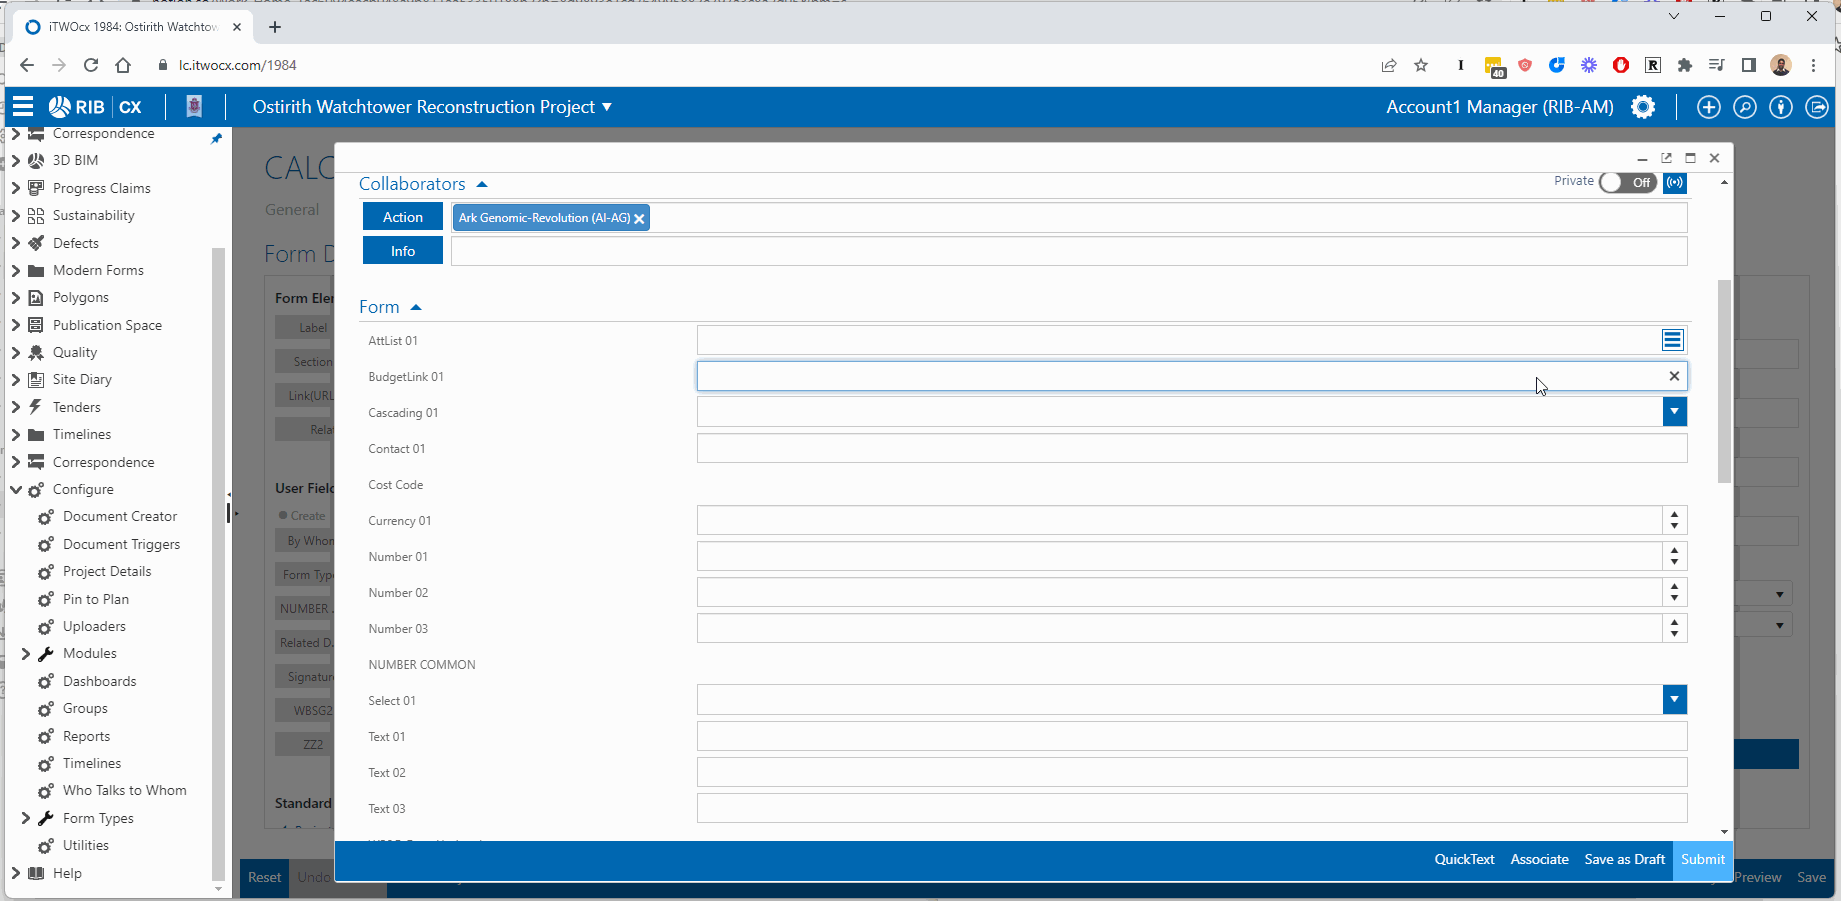
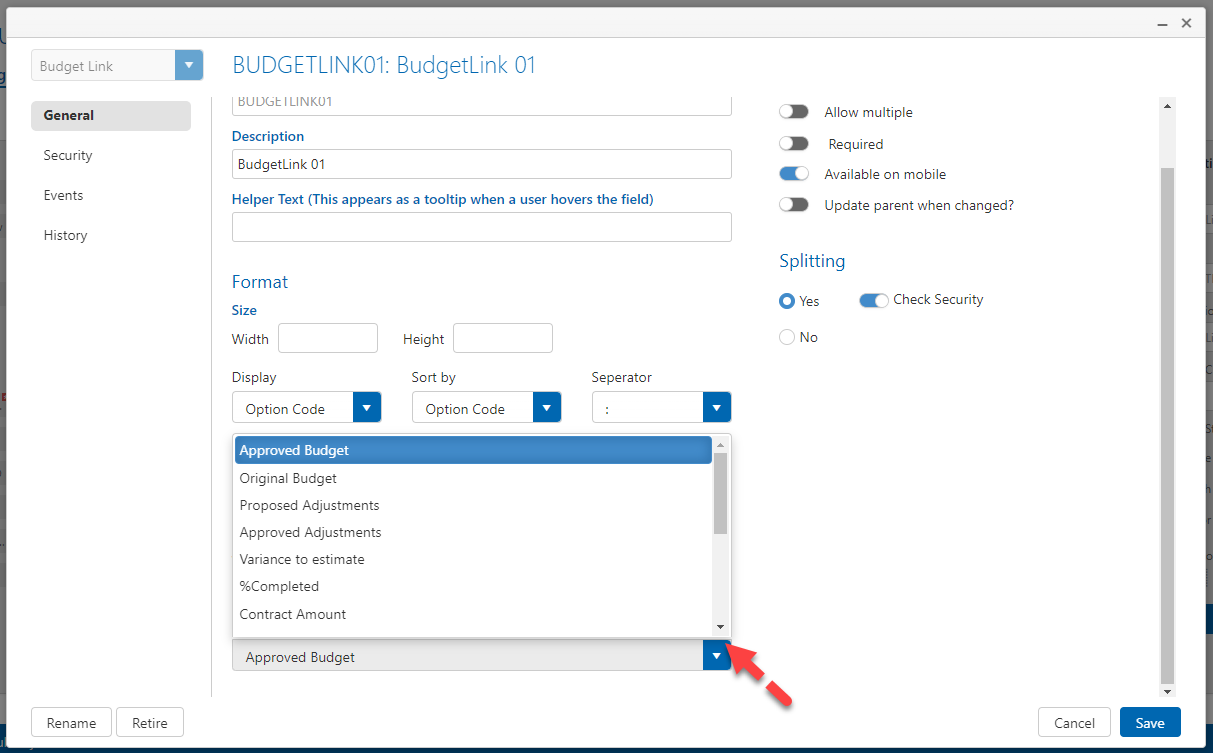
Select Multiple budget lines in a budget link user field
For budget link user fields you will now be able to select multiple budget lines. When multiple budget lines are selected the budget link user field sum up the values for each of those rows.
Once you turn on allow multiple from the budget link user field config you will be able to select multiple rows on the form
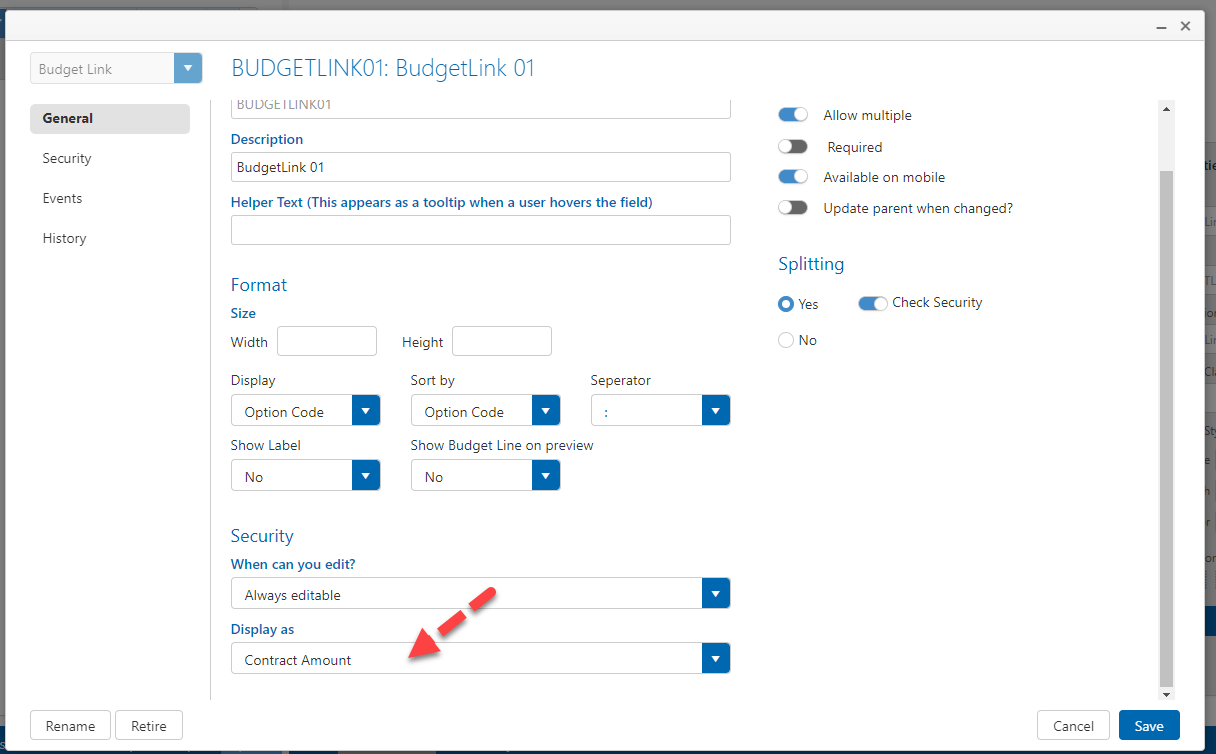
Report on additional Contract Admin values
With this release, you can now display not just the approved budget amount for a budget link user field but a number of other values from your budget.
You can configure which value you wish to display using the display as option shown below.
When selecting values from the budget link user field the field will display values from the configured column in the budget
In the example below it is set to display the Contract Amount


Supported values are
| Options |
|---|
Approved Budget |
Original Budget |
Proposed Adjustments |
Approved Adjustments |
Variance to estimate |
% Completed |
Contract Amount |
Contract Variations Approved |
Contract Variations Pending |
Contract Committed to Date |
Forecast Final Cost |
Previous Variance |
Various to Previous |
Pending Claims |
Approved Claims |
Publication Space
Publish a consolidated revision with a summary of all markups
In this release, we have incorporated a number of customer feedback and revamped how you can print or publish a consolidated revision.
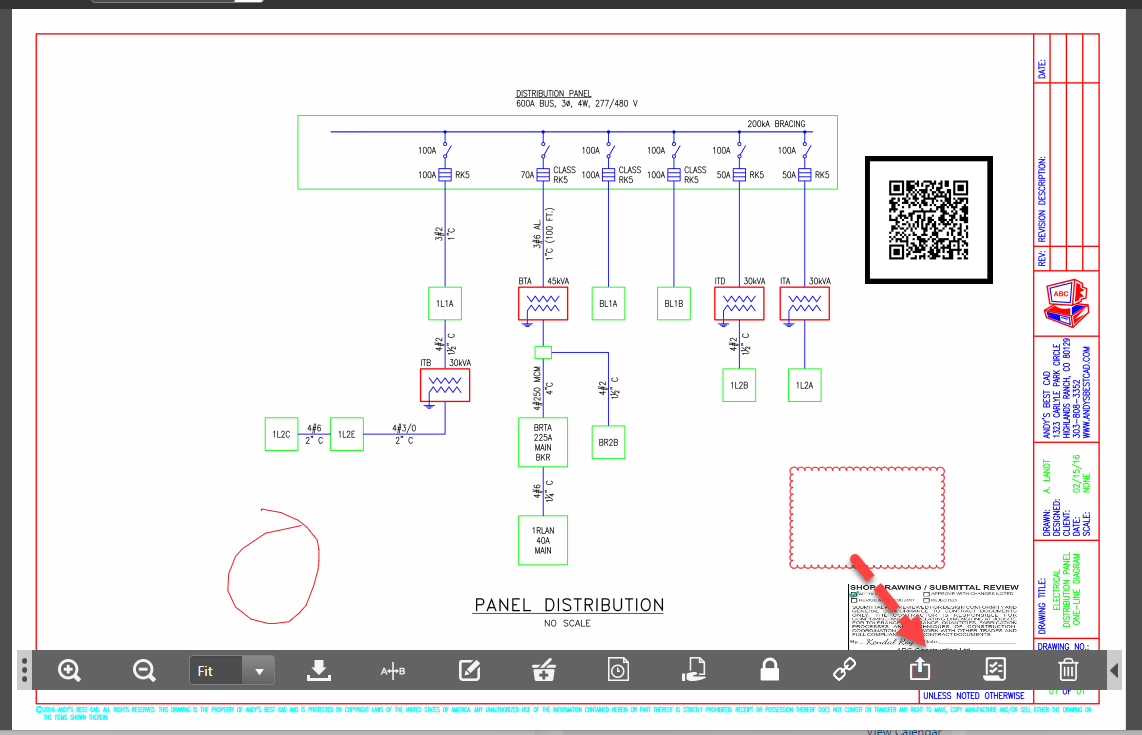
Once some markups have been added, you can click on the new button in the document toolbar shown below.
On the new screen you can pick from 2 options.
- Publish a consolidated revision
Printing
With the print option you can download a PDF file with any or all of markups you select.
Once selections are made you click on download to generate the PDF
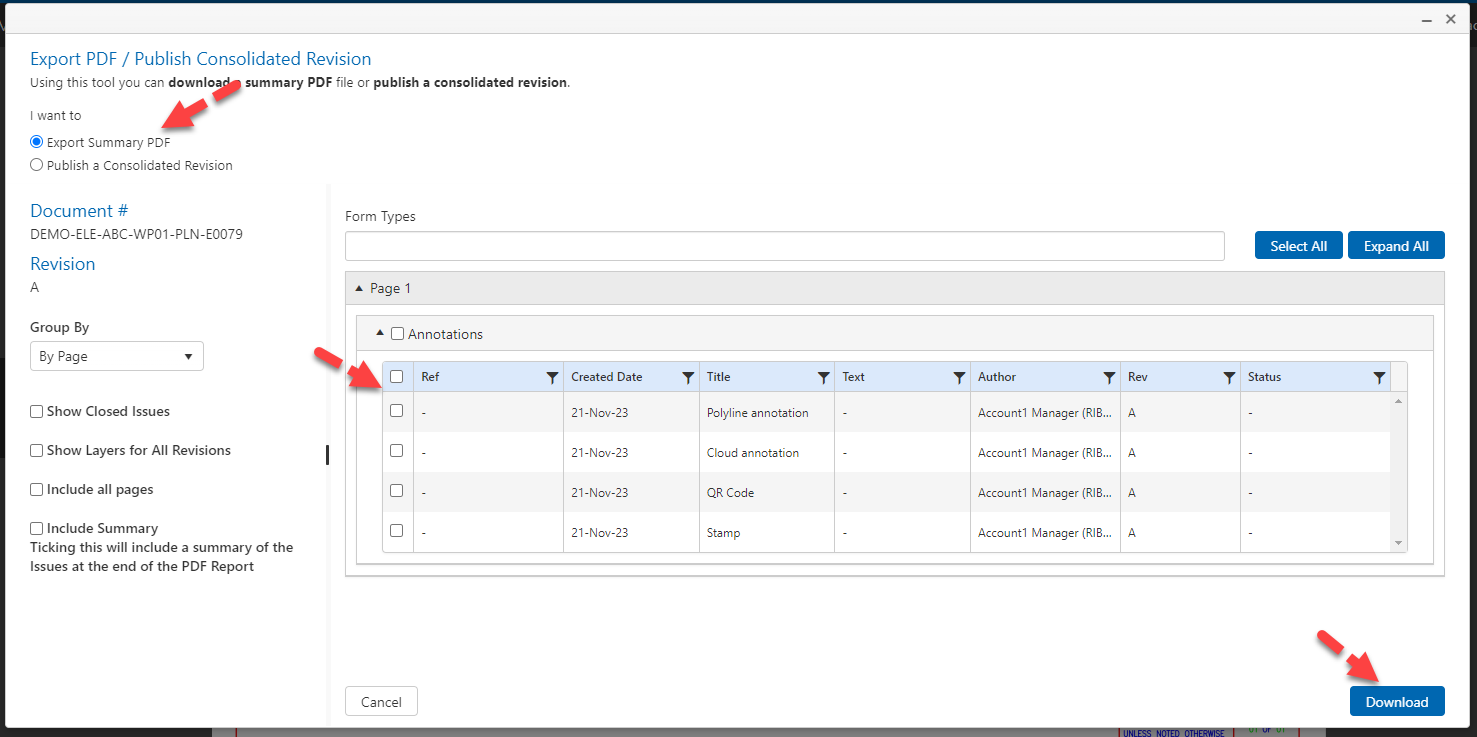
Publish consolidated revision
With this option selected you can select the markups you wish to include in the Consolidated Revision.
You can also optionally incldude a summary table of all the markups you selected.
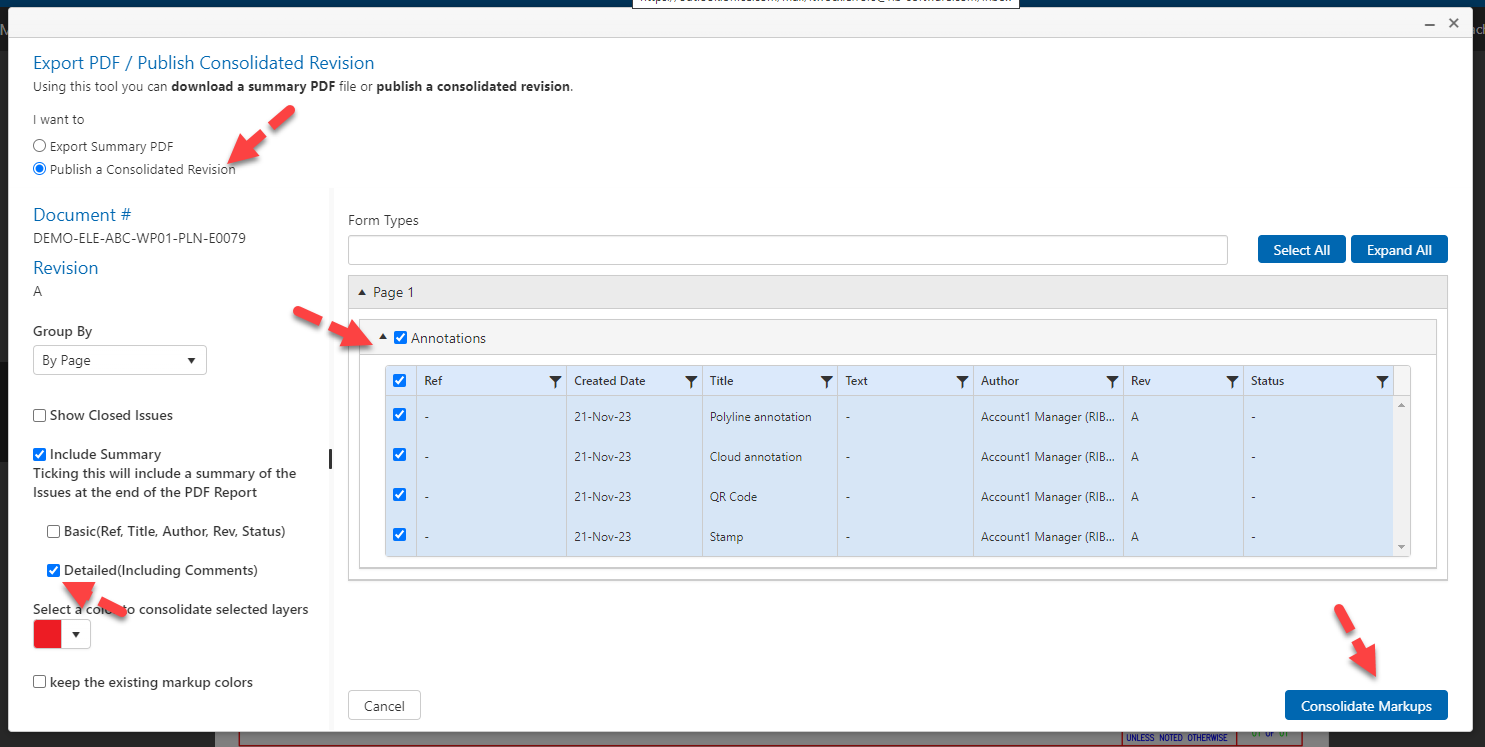
The summary table will include
- Reference of any pinned forms or DRI's
- Created date for the markups of the pinned form or DRI
- Title/ type of annoation
- Text - if it is a text annotation it will include the text
- Author - who added the markup or created the DRI or pinned form.

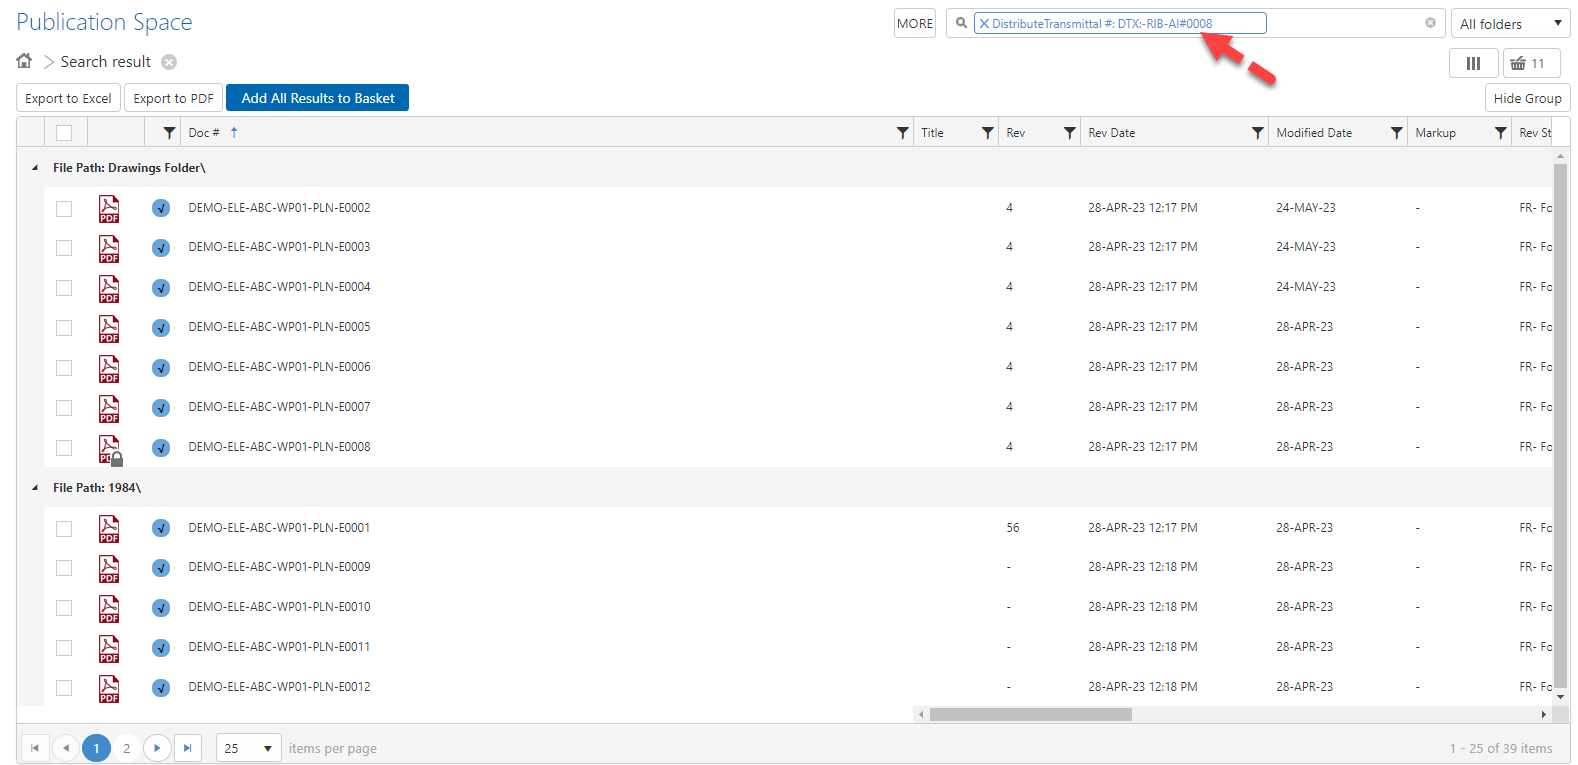
View distributed documents directly within the Publication Space
From a Distribution Transmittal you can select the View in Publication Space option to see just those documents distributed within that DTX in the Publication Space

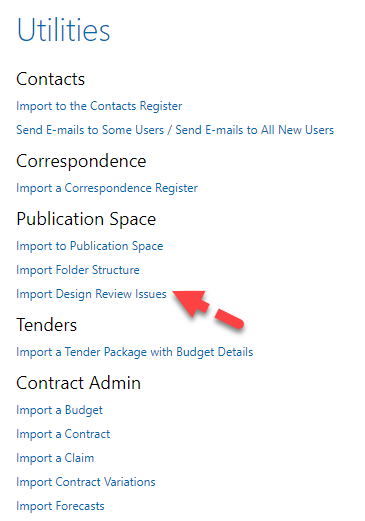
Bulk import user fields for Design Review Issues (DRI's)
Using the DRI import excel file you will be able to directly import values for the DRI user fields.
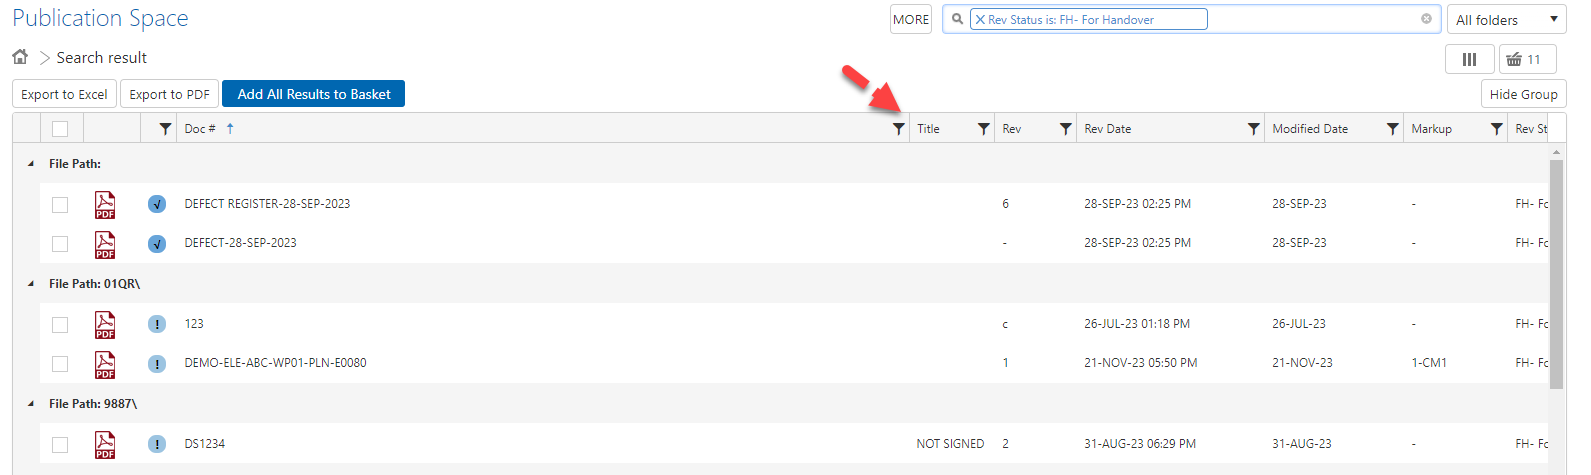
Column filters for Publication Space Searches
Column filters have been added to Publication Space search results
Column to display latest Workflow Transmittal number against a document
A new column has been added to the list of available Publication Space columns to display the latest Workflow Transmittal number for a document.
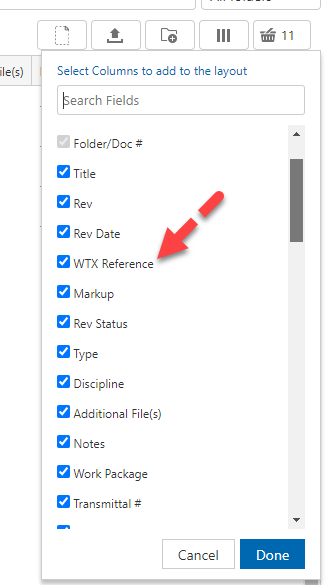
This will display the latest closed that a particular document is associated with.
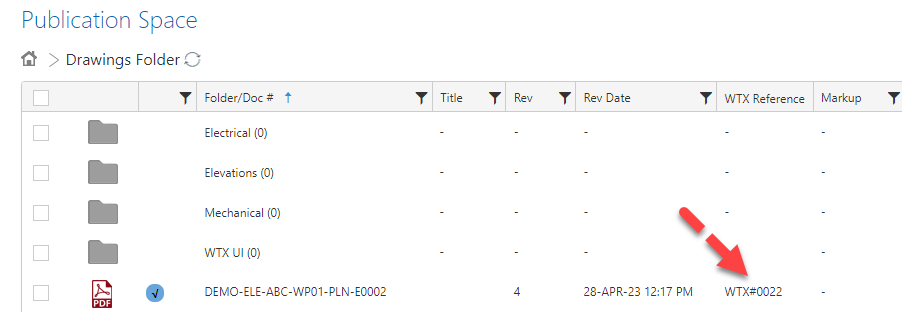
This is a clickable link that will take you directly to that Workflow Transmittal.
Display markups made during a workflow from Workflow Preview screen
When clicking on a document number from the preview screen of a workflow you will now be able to see the relevant markups made on that workflow (as long as you have access to them)
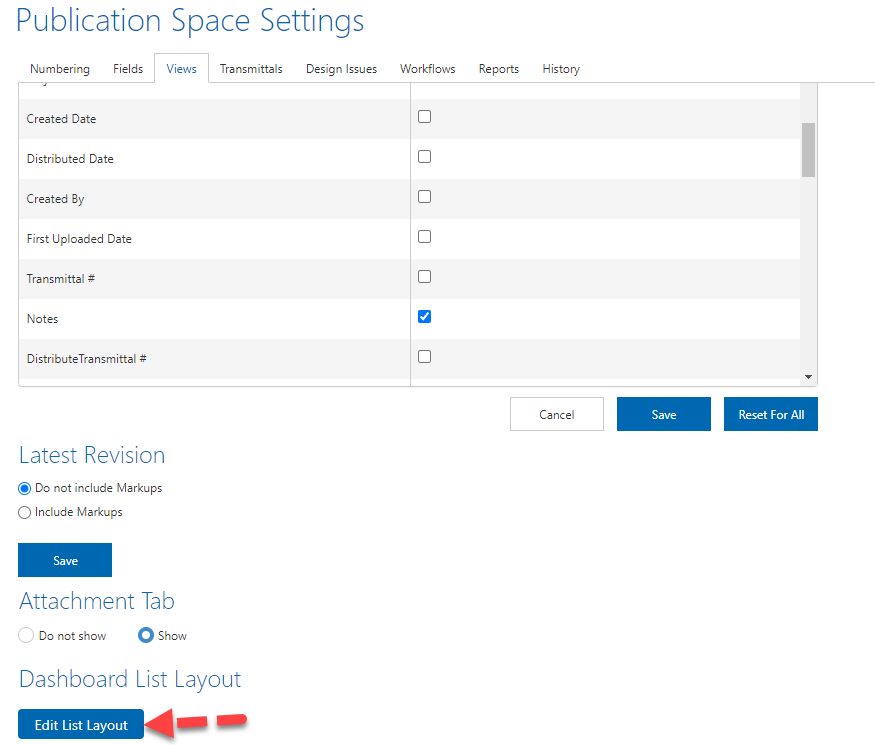
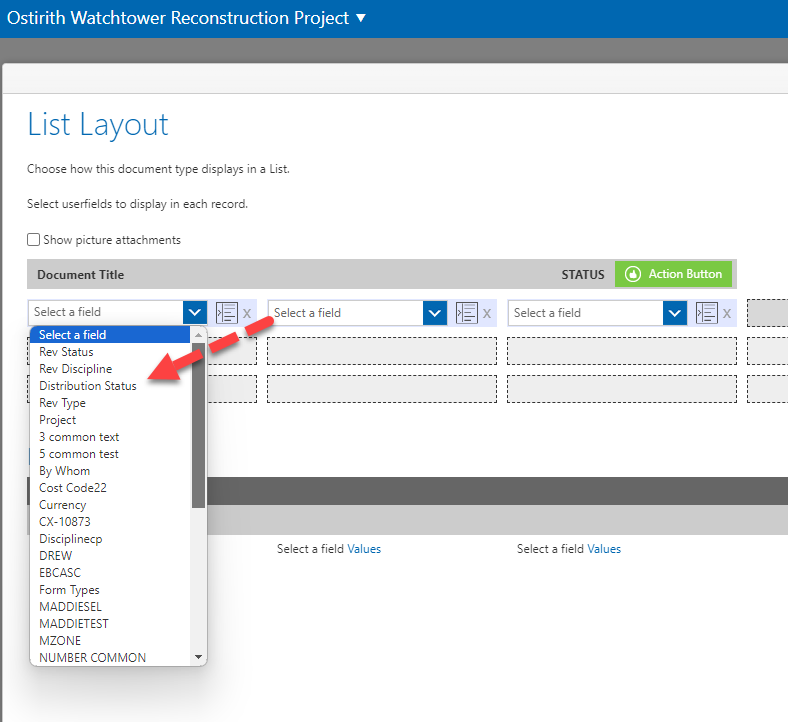
Dashboard list layout configuration for Documents
You can now configure the list layout for Document based count widgets set to the List View.
Document fields available
- Document No#
- Rev Status
- Rev Date
- Rev Value
- Rev Type
- Rev Discipline
- All document user fields should be available to display
- Project
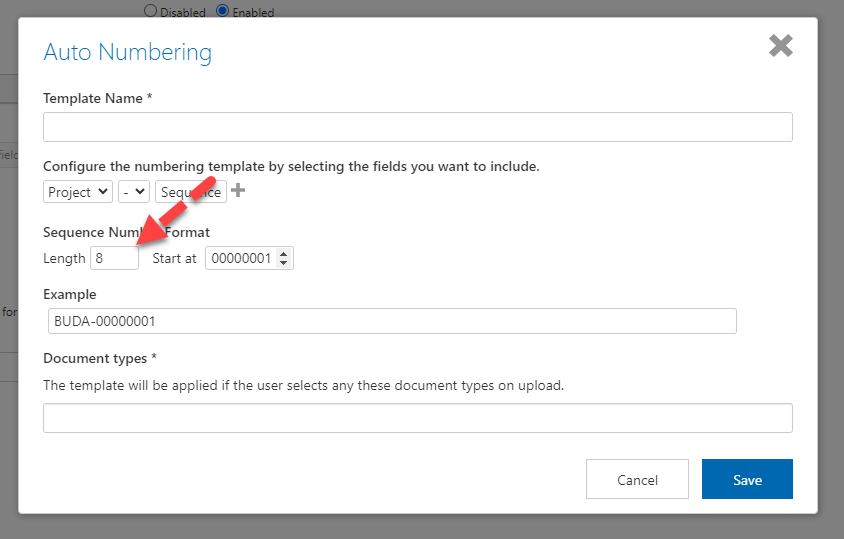
Increased characters supportedin Auto numbering
This setting has been increased to support up to 8 characters.
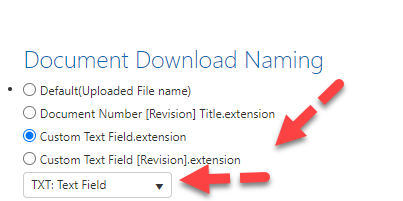
Document Download Naming to include custom text fields
Added additional options to customise the file name of the documents downloaded from the Publication Space
The options are
- Custom Text Field. extension
- Custom Text Field [ Revision ]. extension
Once either of these options are selected, you must pick from a list of text fields in the publication touse in the file name.
Control what layers / markups you see when viewing a revision
Added option in Publication Space settings to configure what layers you see when viewing a document revision.
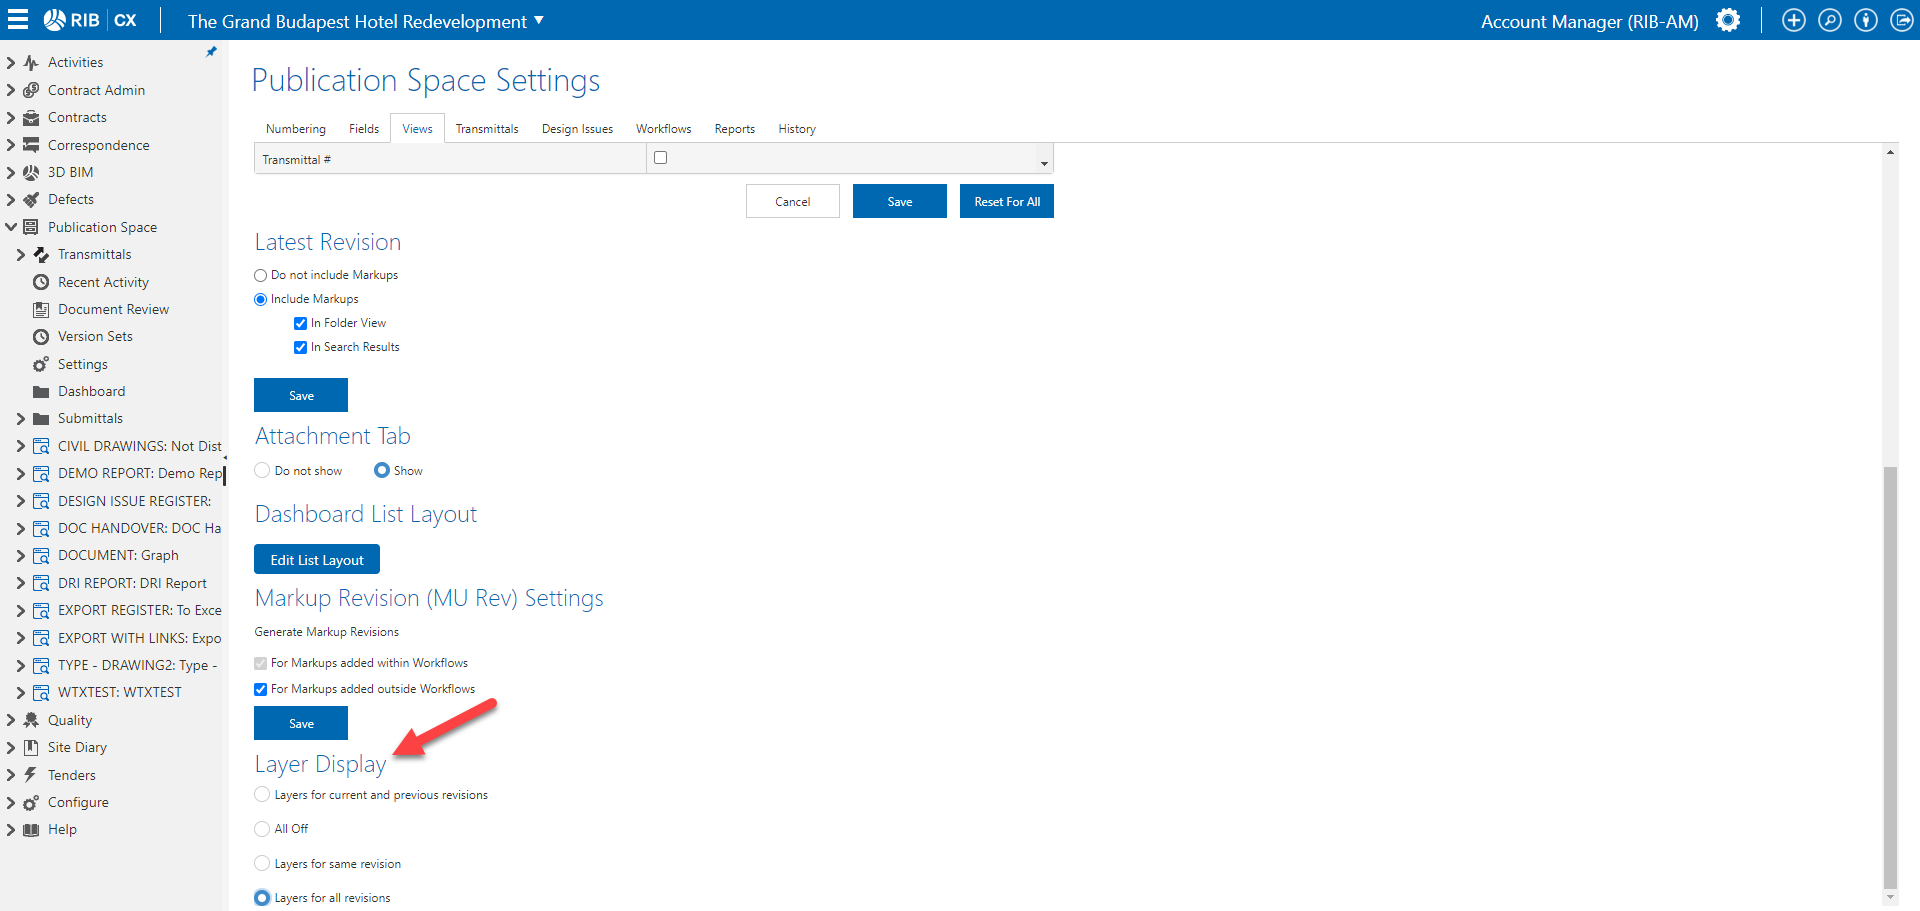
What is a layer/markup?
A layer or makrup is a markup or markups that are added to a revision
Eg, if you add a text markup to revision A, it will create the A-MU1 revision. The text markup is identified as a layer for revision A. Or a markup to revision A.
Options available
Example scenarios Option 1 - Current(Layers for current and previous revisions)
|
Option 2 - All Off
| # | Action | Rev | What you see when on a particular revision - All off |
|---|---|---|---|
| 1 | Upload Rev A | A | A |
| 2 | Added mark up (Text) | A-MU1 | Text markup (A-MU1) |
| 3 | Added mark up (Arrow) | A-MU2 | Arrow (A-MU2) |
| 4 | Added mark up (Circle) | A-MU3 | Circle (A-MU3) |
| 5 | Added QR Code, Added Stamp | A-MU3 | A, Text markup (A-MU1), Arrow (A-MU2), Circle (A-MU3), QR Code, Stamp |
| 6 | Consolidate A-MU1,MU2,MU3 | A-CM1 | A-CM1, QR code, Stamp |
| 7 | Upload Rev B | B | B |
| 8 | Added mark up (Text) | B-MU1 | Text markup (B-MU1) |
| 9 | Added mark up (Arrow) | B-MU2 | Arrow (B-MU2) |
| 10 | Added mark up (Circle) | B-MU3 | Circle (B-MU3), B Stamp, B QR Code |
| 11 | Added QR Code, Added Stamp | B-MU3 | Circle (B-MU3), B Stamp, B QR Code |
| 12 | Consolidate A-MU1,MU2,MU3 | B-CM1 | B-CM1 |
Option 3 - Layers for same revision
| # | Action | Rev | What you see when on a particular revision - Layers for same revision |
|---|---|---|---|
| 1 | Upload Rev A | A | A, Text markup (A-MU1), Arrow (A-MU2), Circle (A-MU3), A-CM1, QR Code, Stamp |
| 2 | Added mark up (Text) | A-MU1 | A, Text markup (A-MU1), Arrow (A-MU2), Circle (A-MU3), A-CM1, QR Code, Stamp |
| 3 | Added mark up (Arrow) | A-MU2 | A, Text markup (A-MU1), Arrow (A-MU2), Circle (A-MU3), A-CM1, QR Code, Stamp |
| 4 | Added mark up (Circle) | A-MU3 | A, Text markup (A-MU1), Arrow (A-MU2), Circle (A-MU3), A-CM1, QR Code, Stamp |
| 5 | Added QR Code, Added Stamp | A-MU3 | A, Text markup (A-MU1), Arrow (A-MU2), Circle (A-MU3), A-CM1, QR Code, Stamp |
| 6 | Consolidate A-MU1,MU2,MU3 | A-CM1 | A, Text markup (A-MU1), Arrow (A-MU2), Circle (A-MU3), A-CM1, QR Code, Stamp |
| 7 | Upload Rev B | B | B, Text markup (B-MU1, Arrow (B-MU2), Circle (B-MU2) |
| 8 | Added mark up (Text) | B-MU1 | B, Text markup (B-MU1, Arrow (B-MU2), Circle (B-MU2) |
| 9 | Added mark up (Arrow) | B-MU2 | B, Text markup (B-MU1, Arrow (B-MU2), Circle (B-MU2) |
| 10 | Added mark up (Circle) | B-MU3 | B, Text markup (B-MU1, Arrow (B-MU2), Circle (B-MU2) |
| 11 | Added QR Code, Added Stamp | B-MU3 | B, Text markup (B-MU1, Arrow (B-MU2), Circle (B-MU2), B Stamp, B QR Code |
Option 4 - Layers for same revision
| # | Action | Rev | What you see when on a particular revision - Layers for all revisions |
|---|---|---|---|
| 1 | Upload Rev A | A | A, Text markup (A-MU1), Arrow (A-MU2), Circle (A-MU3), A-CM1 + All B rev layers also |
| 2 | Added mark up (Text) | A-MU1 | A, Text markup (A-MU1), Arrow (A-MU2), Circle (A-MU3), A-CM1 + All B rev layers also |
| 3 | Added mark up (Arrow) | A-MU2 | A, Text markup (A-MU1), Arrow (A-MU2), Circle (A-MU3), A-CM1 + All B rev layers also |
| 4 | Added mark up (Circle) | A-MU3 | A, Text markup (A-MU1), Arrow (A-MU2), Circle (A-MU3), A-CM1 + All B rev layers also |
| 5 | Added QR Code, Added Stamp | A-MU3 | A, Text markup (A-MU1), Arrow (A-MU2), Circle (A-MU3), A-CM1 + All B rev layers also |
| 6 | Consolidate A-MU1,MU2,MU3 | A-CM1 | A, Text markup (A-MU1), Arrow (A-MU2), Circle (A-MU3), A-CM1 + All B rev layers also |
| 7 | Upload Rev B | B | A, Text markup (A-MU1), Arrow (A-MU2), Circle (A-MU3), A-CM1 + All B rev layers also |
| 8 | Added mark up (Text) | B-MU1 | A, Text markup (A-MU1), Arrow (A-MU2), Circle (A-MU3), A-CM1 + All B rev layers also |
| 9 | Added mark up (Arrow) | B-MU2 | A, Text markup (A-MU1), Arrow (A-MU2), Circle (A-MU3), A-CM1 + All B rev layers also |
| 10 | Added mark up (Circle) | B-MU3 | A, Text markup (A-MU1), Arrow (A-MU2), Circle (A-MU3), A-CM1 + All B rev layers also |
| 11 | Added QR Code, Added Stamp | B-MU3 | A, Text markup (A-MU1), Arrow (A-MU2), Circle (A-MU3), A-CM1 + All B rev layers also |
| 12 | Consolidate A-MU1,MU2,MU3 | B-CM1 | A, Text markup (A-MU1), Arrow (A-MU2), Circle (A-MU3), A-CM1 + All B rev layers also |
Forms
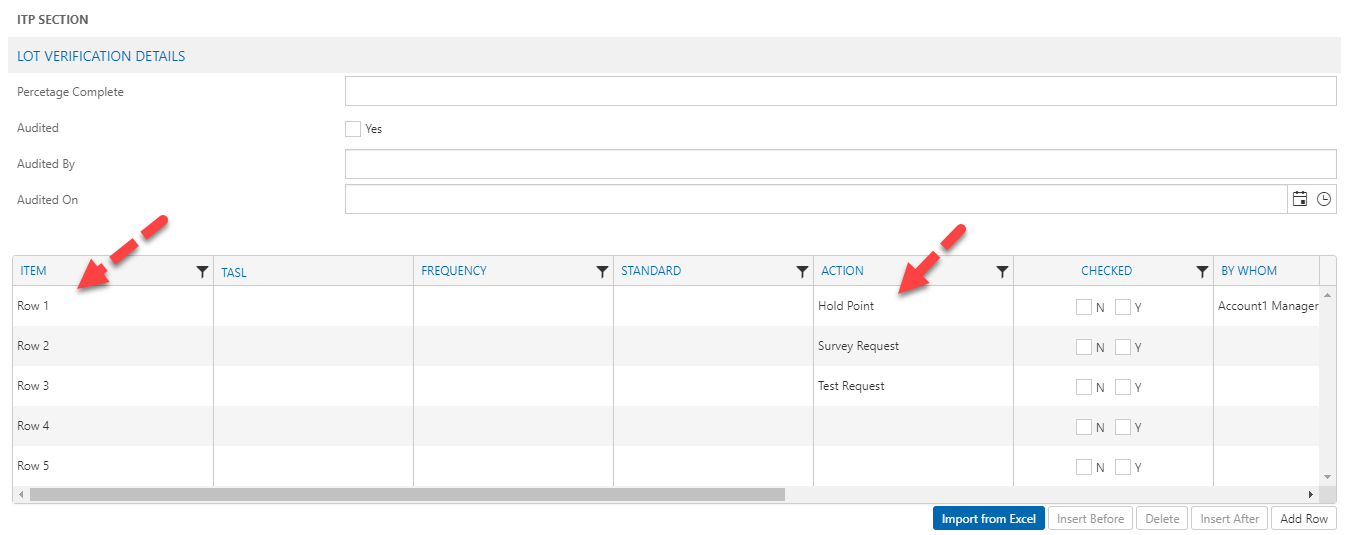
Set default values for user fields in a list
We've expanded the ability to set default values for user fields to fields that are configured within a list.
To add default values to fields within a list go to the user field configuration page from the user fields page in config or the form layout editor
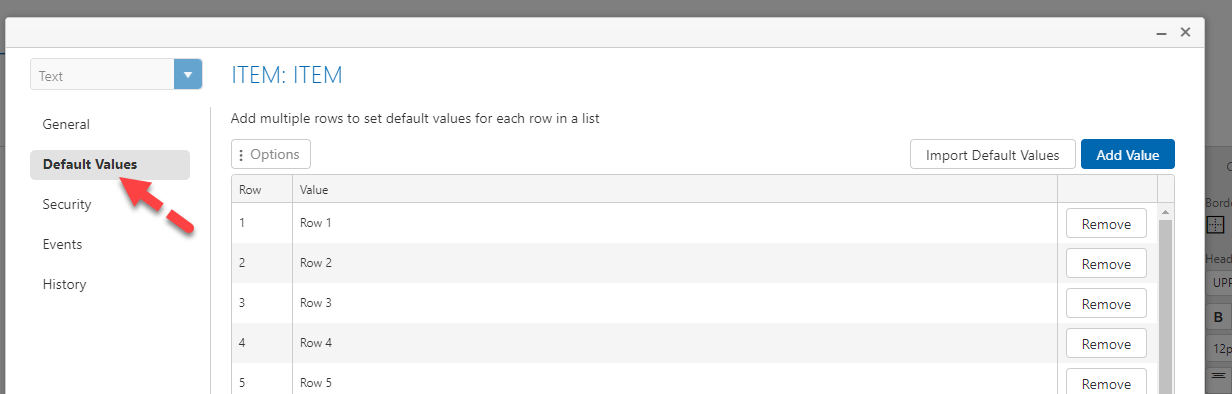
Click on the Default Values option in the menu and from here you can click add value to add default values per row.
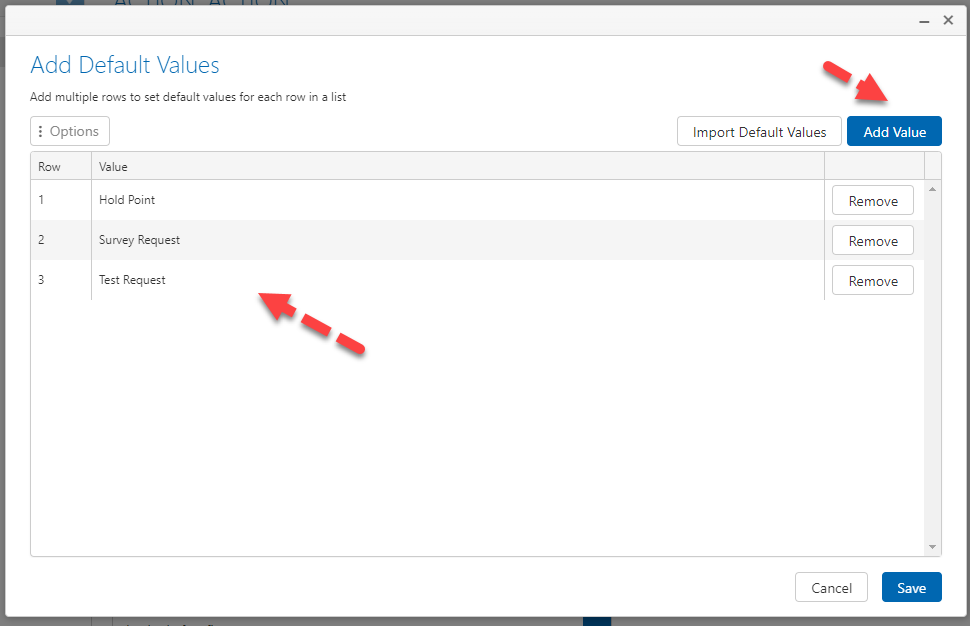
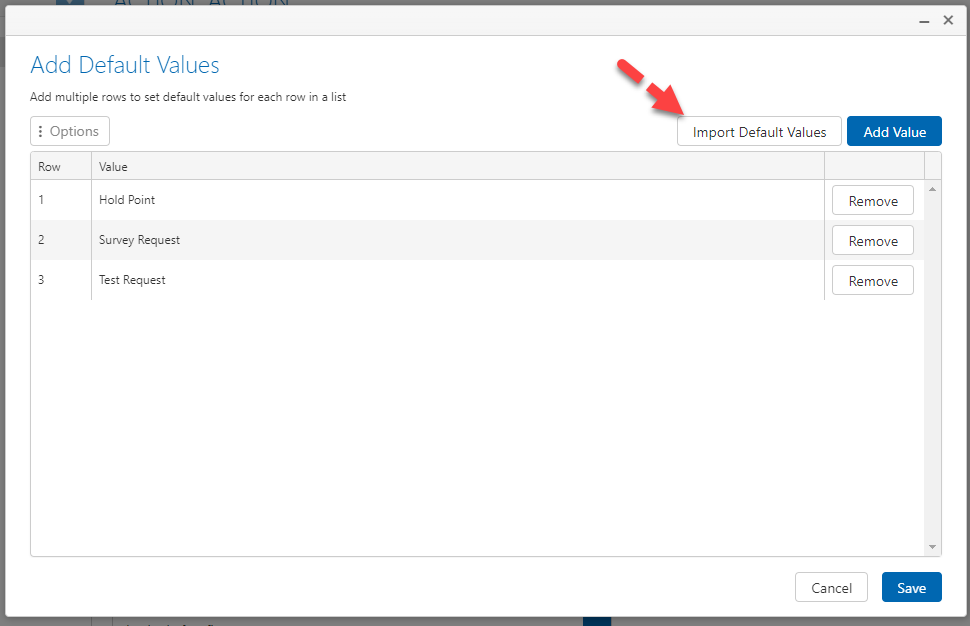
You can also import values by clicking on the import default values button
When the form is created the list will be prepopulated with the default values set
Copy paste images in comments and rich text fields
We now support copy pasting images (from the clipboard) into the comments field or rich text fields.
This is supported on a new form or when responding to a form
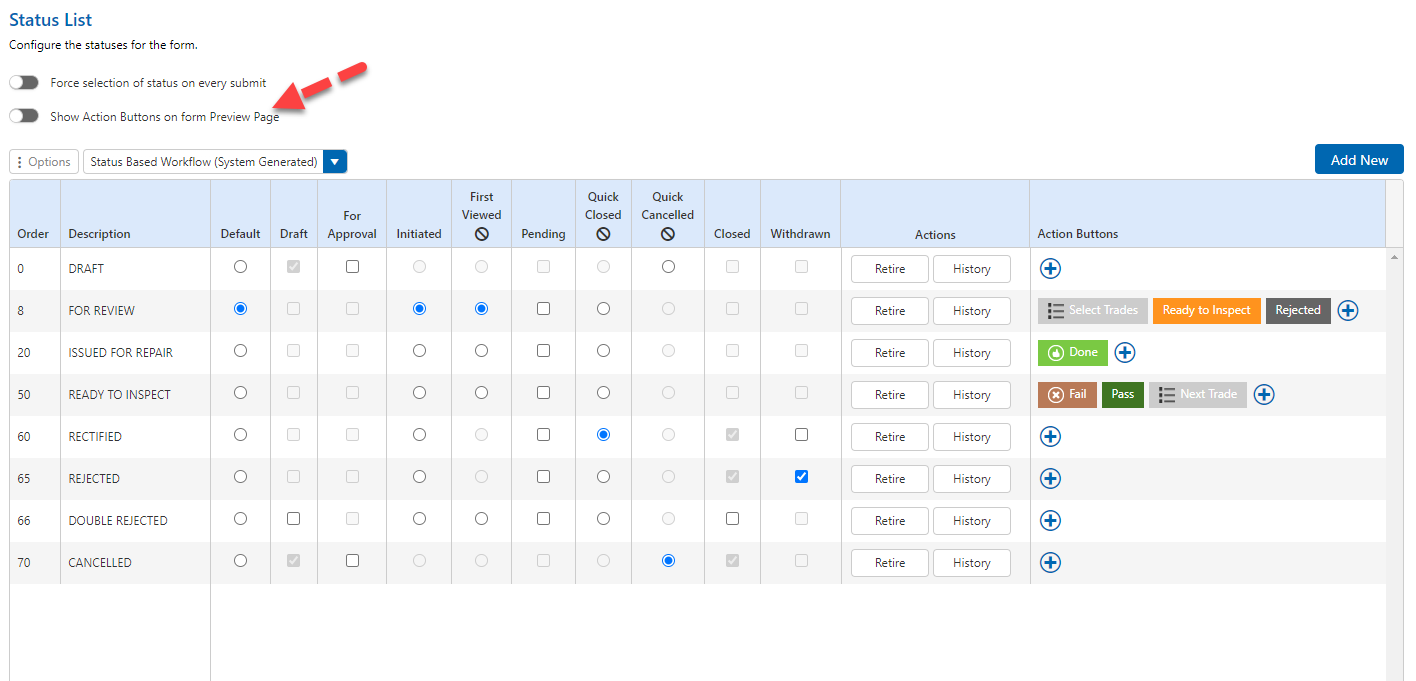
Turn off action buttons on the preview screen
Optionally turn off action buttons from appearing on the screen. With this option turned on, action buttons will only show when responding to a form
Split and carry values to another form without user field edit rights
Added a new config option in user fields to manage how information is carried forward to another form type when splitting.
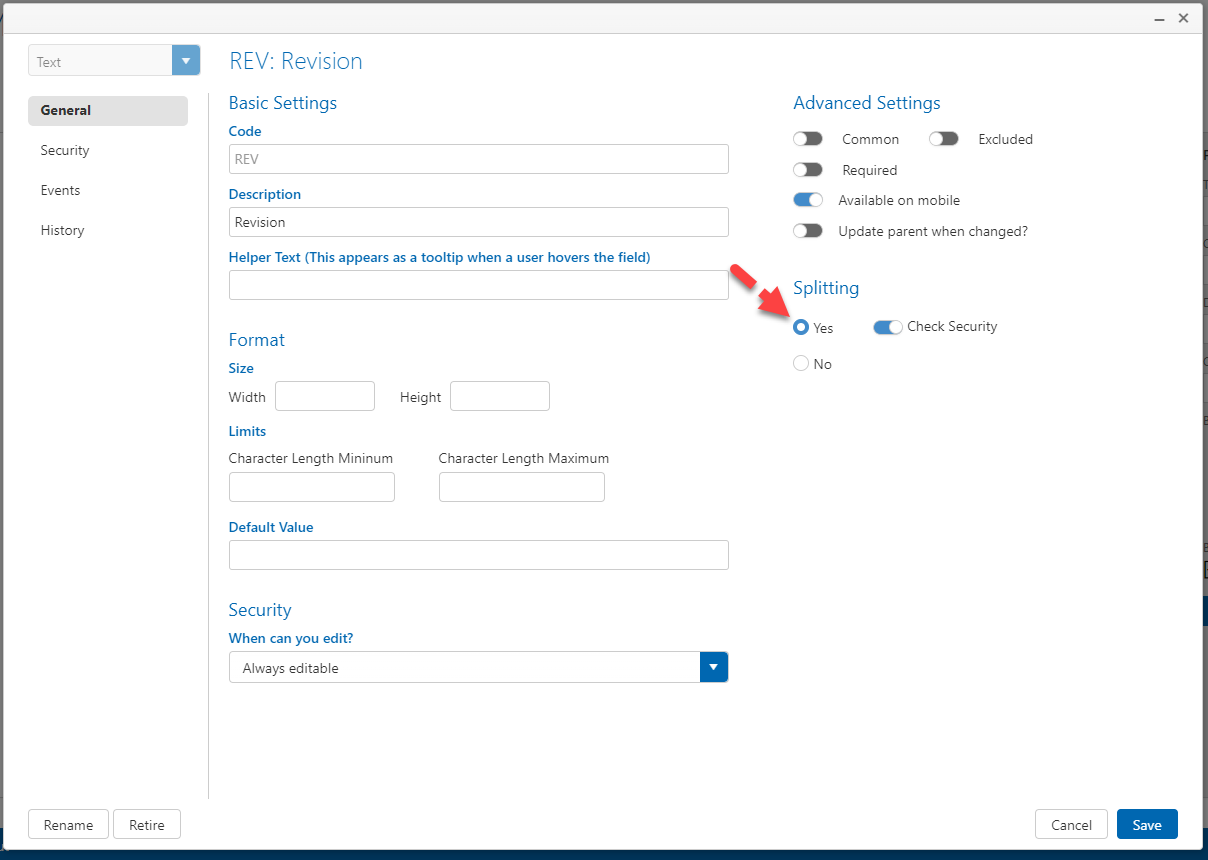
Below are the options available
| Configuration | Expected Result |
|---|---|
Split = Yes Check security = On | Values will only be carried forward if you have edit rights in the destination form type Applies to fields on the Form Applies to fields on the List |
Split = Yes Check security = Off | Values will only be carried forward even if you do not have edit rights Applies to fields on the Form Applies to fields on the List |
Split = No | Values will not be carried forward |
Noting that the security needs to be configured in the Origin forms user field security. i.e. If splitting from a template to a checklist then the security must be set on the template form type
Confirmation when you submit a comment via a preview email
When you submit a comment via a preview email a confirmaiton will now be shown to make it clear that the comment has been submit to form
Automatic Progression for Action Buttons
Added the ability to automatically progres an action button after waiting a specific number of days in that status.
You can turn on this option under post conditions in action buttons and configure the number of days the form should wait in the specific status before progressing the form
This routine for checking runs once per day, and will check for any forms meeting this criteria, and progress them.
The routine runs everyday at 9am.

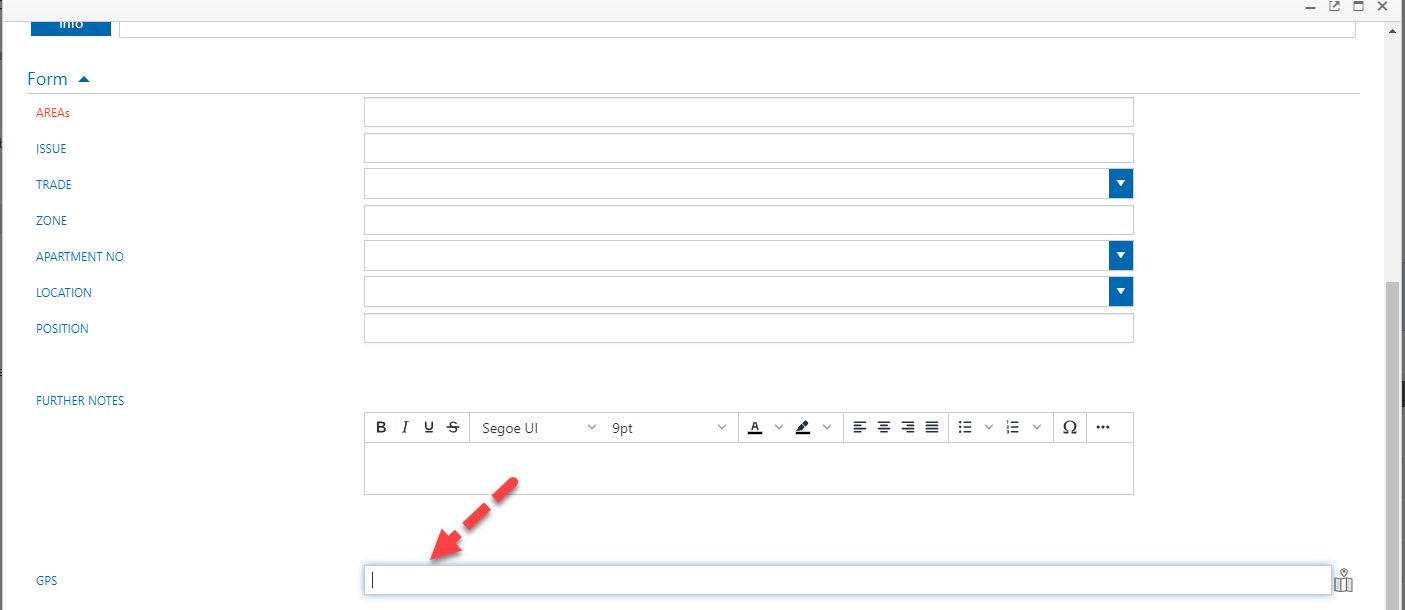
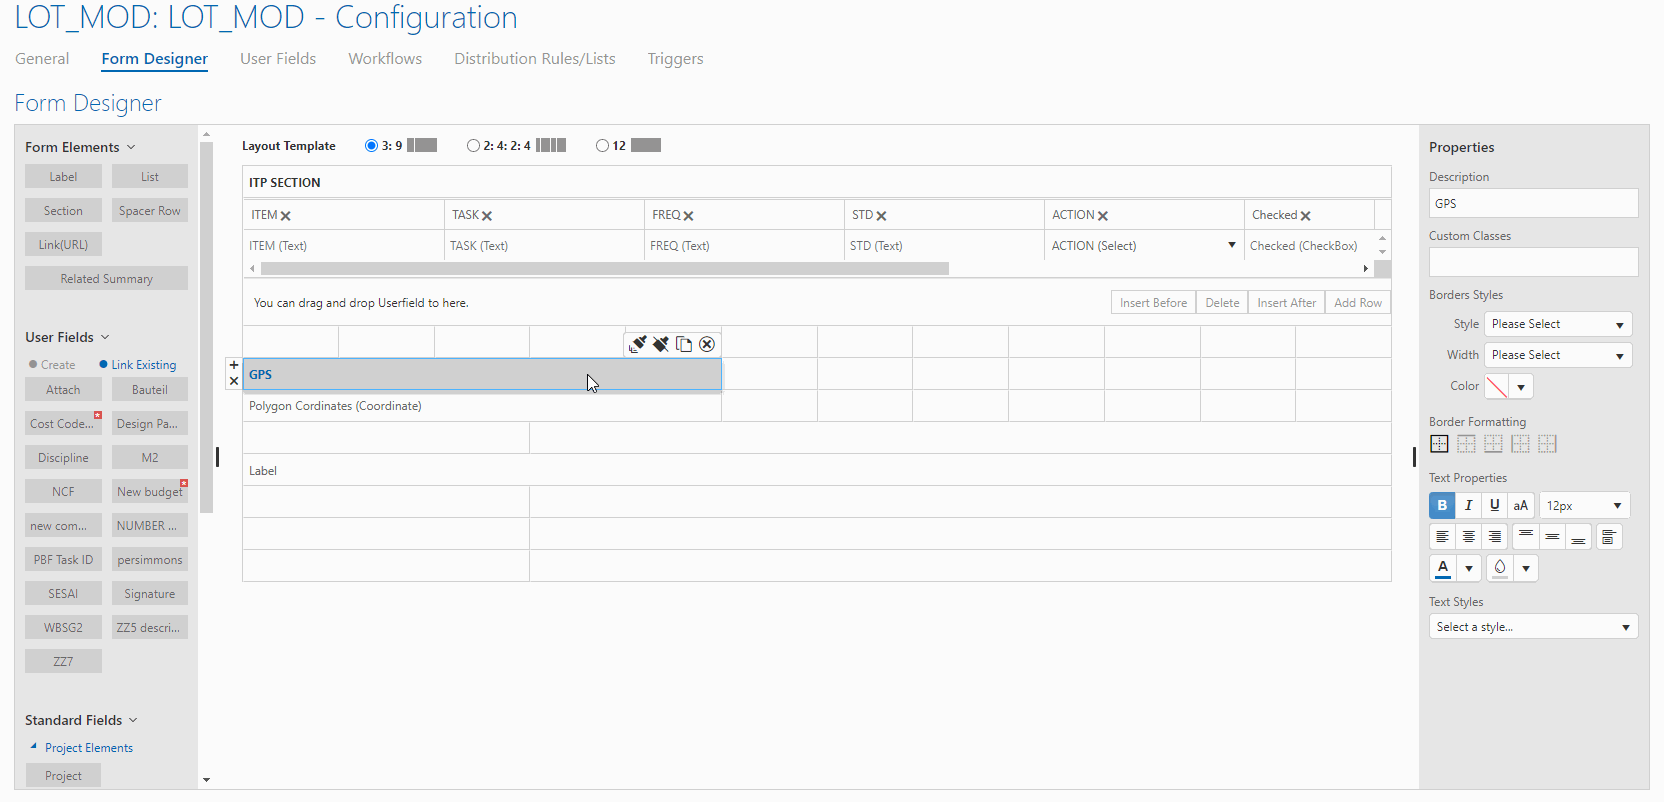
Manually enter values for a GPS user field
Now you can edit a GPS field and manually add cordinate values to a Cordinate (GPS field). Adding manual cordinates will look up those values and update the pin to the relevant location.
Action Buttons - reordering
Added ability to drag and drop to reorder action buttons. The new order will be automatically saved and reflected on the forms they are applicable to
Action buttons - Return option for status
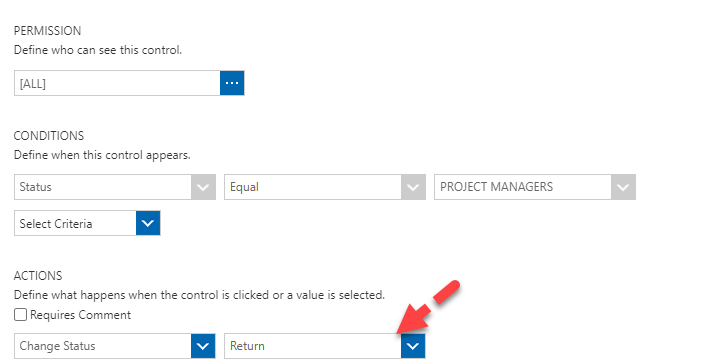
To determing the previous Status the system will check comments/history for a previous status where the name is different to current.
If there is no comments/history then it return function will keep the current status
If there is only a history entry with the same status return function will keep the current status.
It does not consider security checking when checking the previous status.
Return to Action and Return Status could give different results based on the above. As you could change the action without changing the status name.
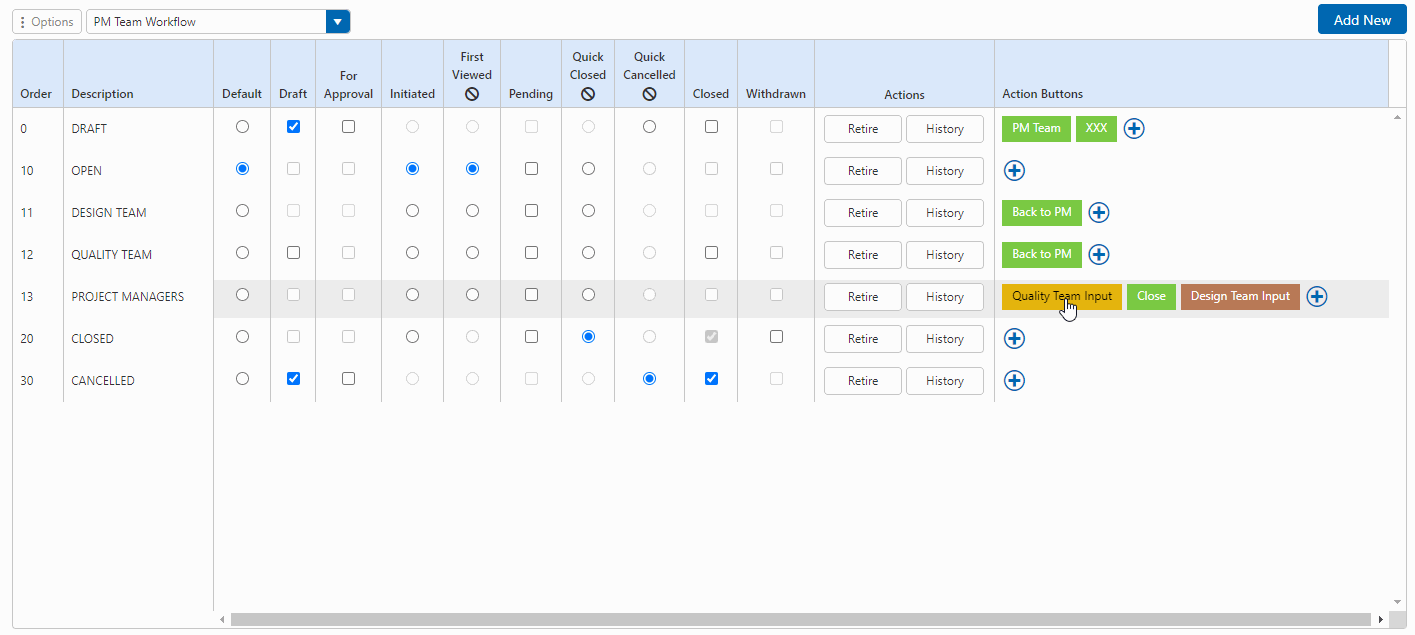
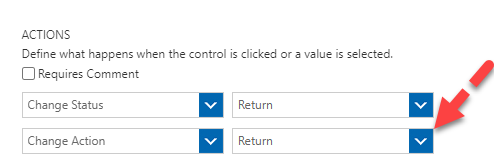
Action Buttons - return option for action (group or multiple users)
When an action button is configured change action user to Return, the system will now address all previous participants (group or multiple users)
Searching
Search using a project role
In searching, we've added the ability to search by a Project Role. In this type of search, the results will look for all companies in the specified role and users within those companies. This will allow you to do more broad searches to find the information you are looking for.
New user interface for cascading user fields in global search
We have updated the user interface for cascading fields to help you filter and search for forms much easier in this version.
The interface shows the cascading field in the familiar tree view you see on forms. Multiple selections can be made to search across many options.

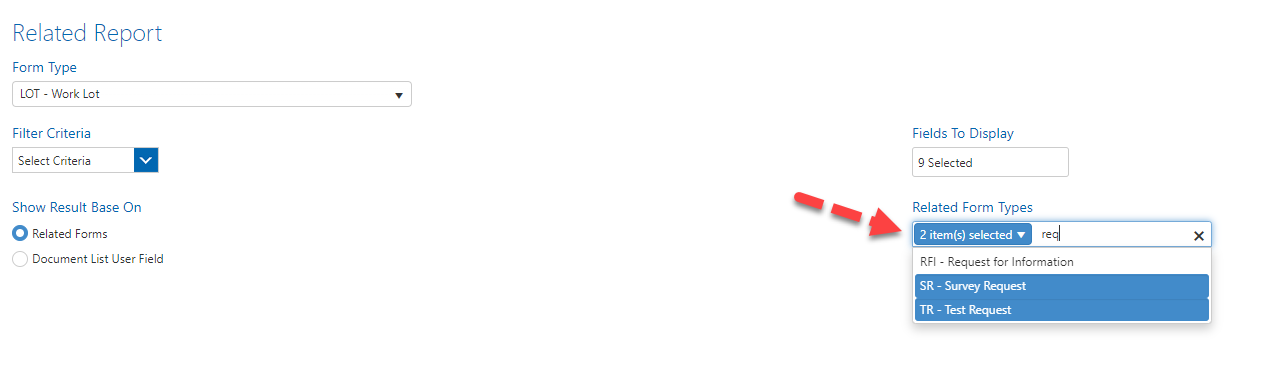
Related report - Filter form types
When running a related report you can now decided which forms you wish to include in the related section
Related report - Show results based on Document List User Field(s)
When running a related report you can select to show results based on a document list user field. This will display the related forms per row in on a form with that document list user field
First select the document list user field option and pick the list control that you wish to report on (some forms may have many lists however, you can report on one at a time) and then select the document list user field from within that list.
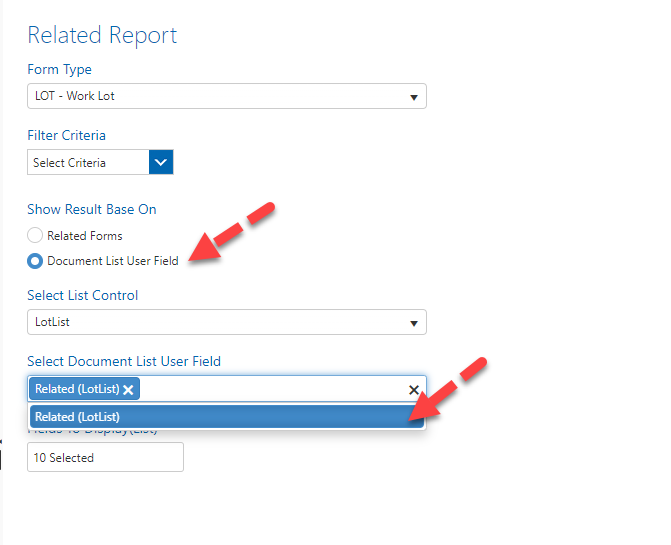
Results for each form will be grouped by the list rows. You can expand each row to see the related forms for that row.
Administrator Tools
Copy a user group
You can copy an existing User Group and its content via the copy tool we've added.

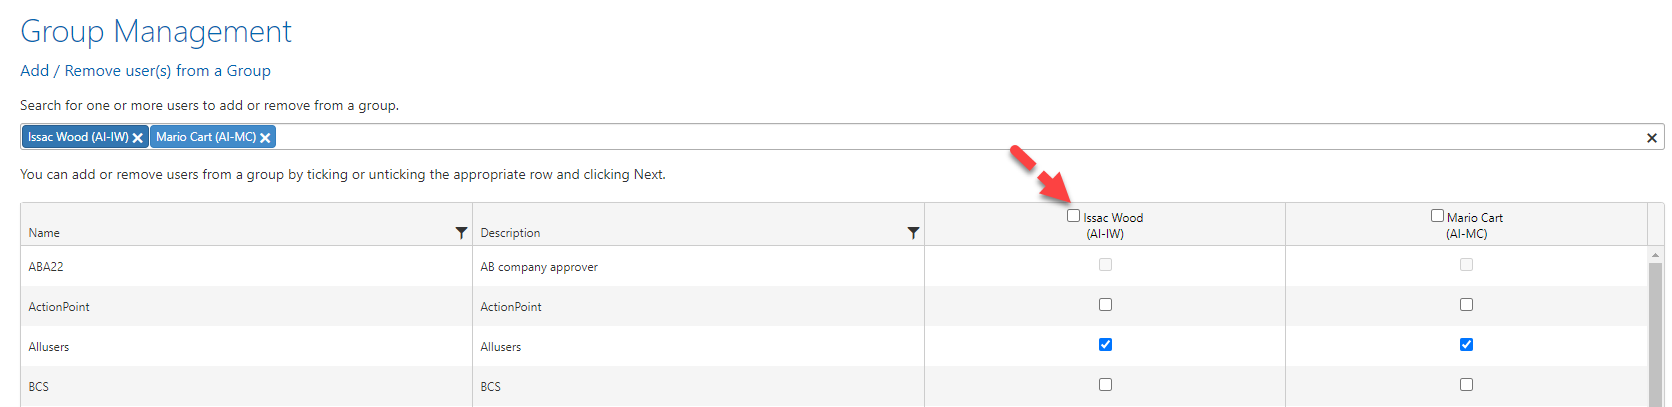
Bulk select groups for a search
When managing users across user groups, you can now bulk select all user groups for a single search with the bulk tick option.
Change Distribution List applicability even if you are not a Project Adminstrator
From this release users who are not Project Adminstrators will be able to change the aplicability of Distribution rules when they are creating them.
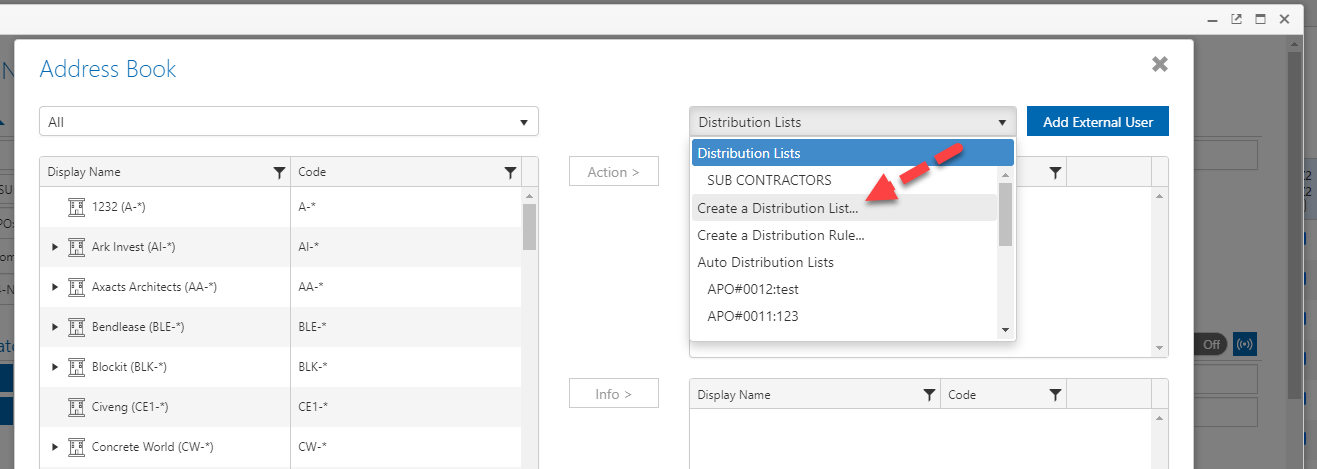

This change only applies to Distribution Lists.
Extra column on user field page to display "Edit in Status"
Added column to display which statuses a user field can be edited in

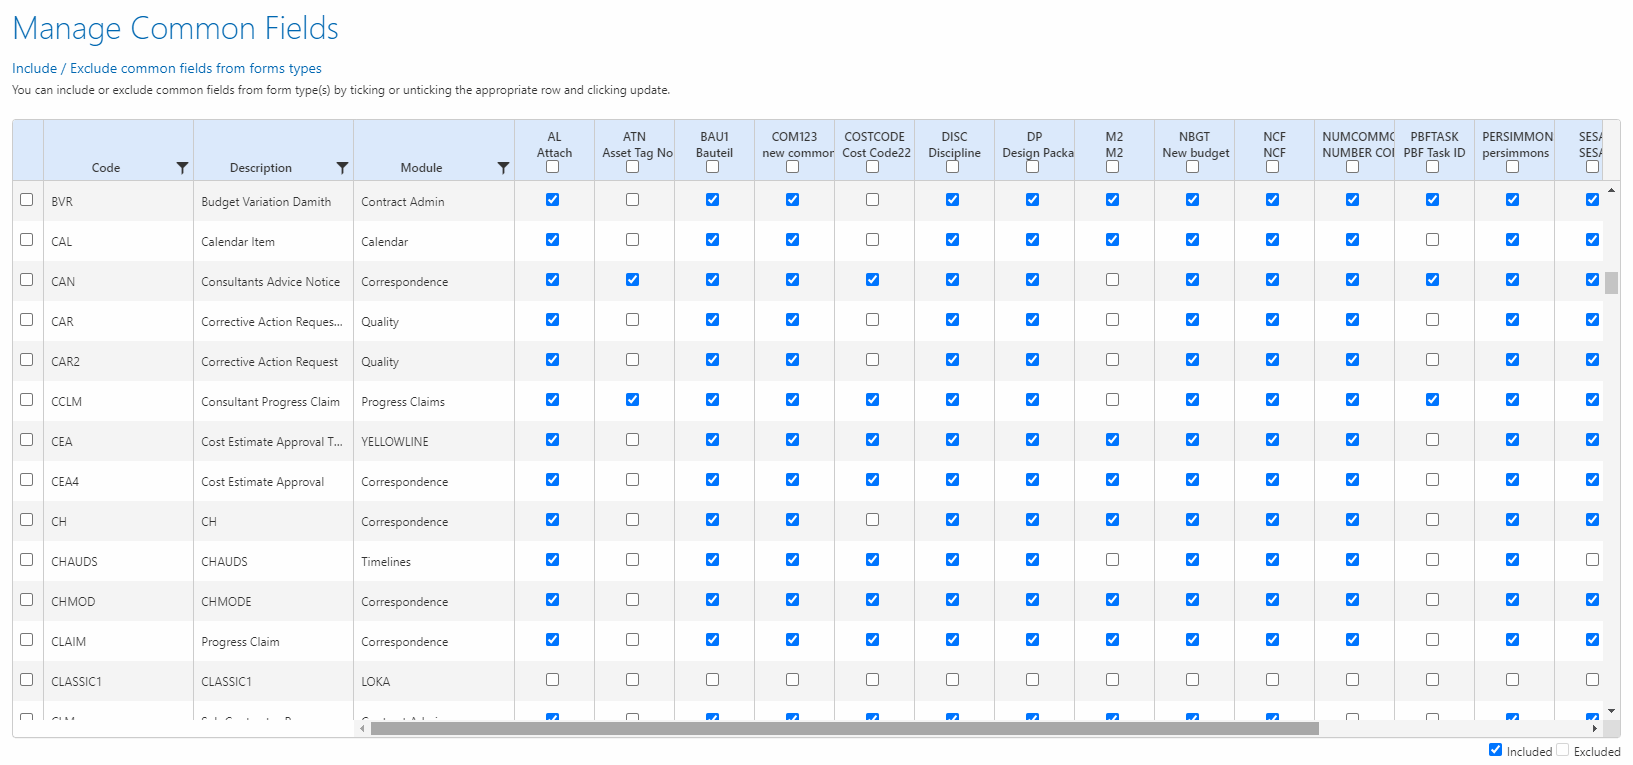
Bulk checkbox per form type for common user field management
You can
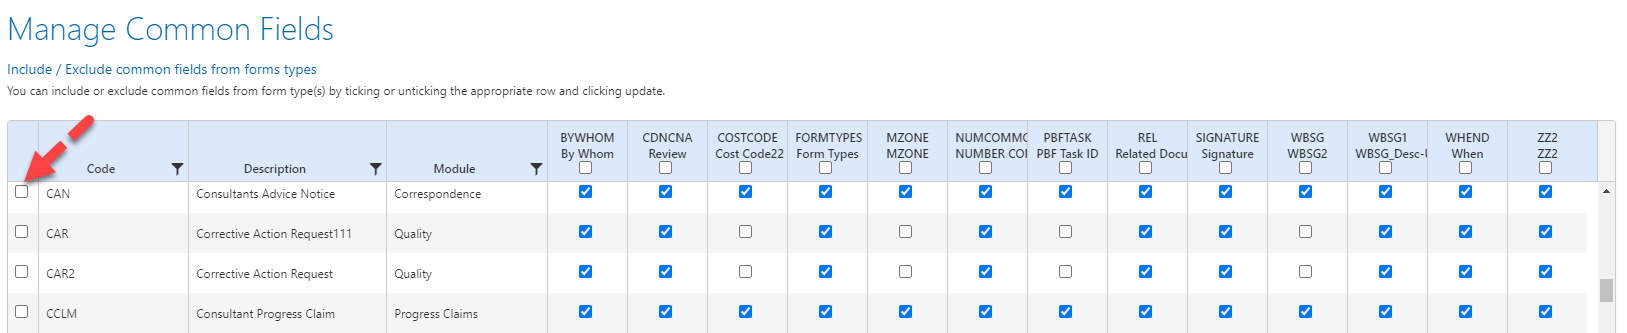
Frozen columns for common user field management
Added frozen columns to the manage common fields tool for easier navigation.
Modern Forms Editor
Format Painter
Added a format painter tool to the forms editor. You can copy the format applied to a single cell and paste that format to 1 or more other cells in the forms designer
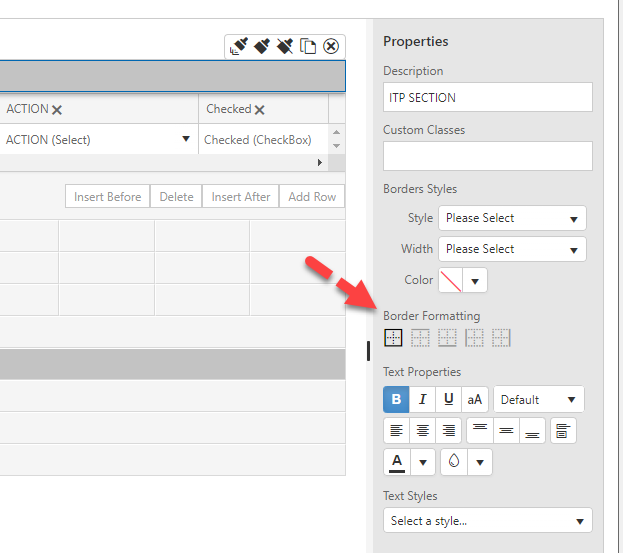
Left, right, top, bottom border style selections
You can now style a cell with custom border styles using the new border selection tool
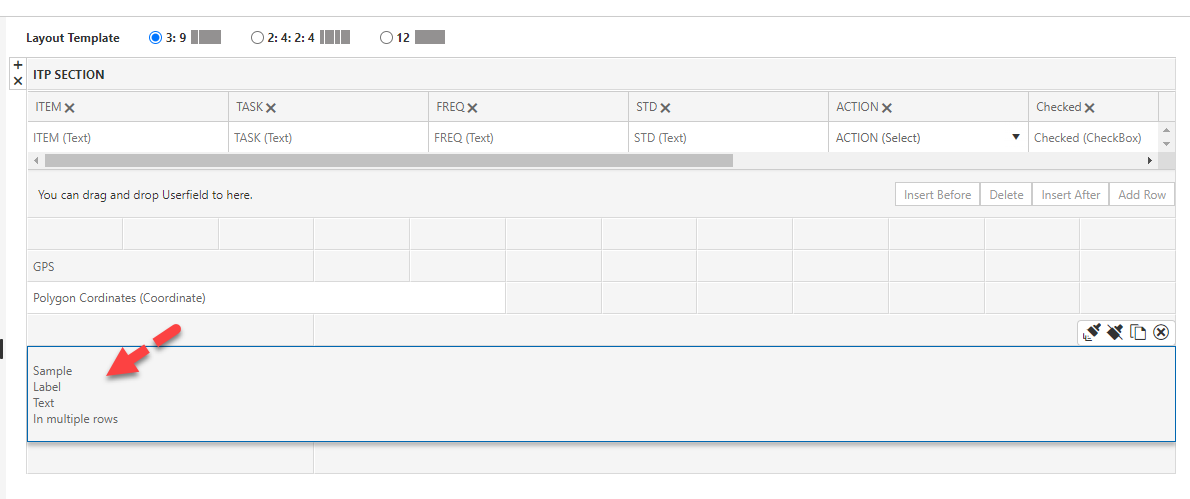
Multi row labels
Labels now support typing text in multiple rows.
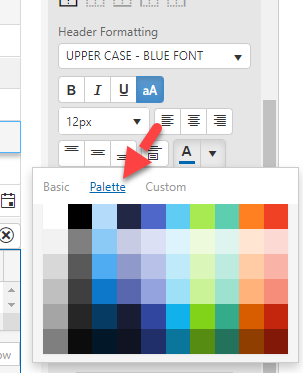
Colour picker with basic, pallete and custom colour options
The colour picker has been upgraded to ensure that you have access to short cuts to many more default colours.
The picker has been changed to include 3 tabs
- Default
- Pallete
- Custom
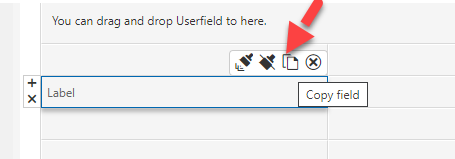
Copy paste a Label
You now have the ability copy paste labels using the copy option in the context menu when a label has been selected
23.12 Mobile app release notes can be found here